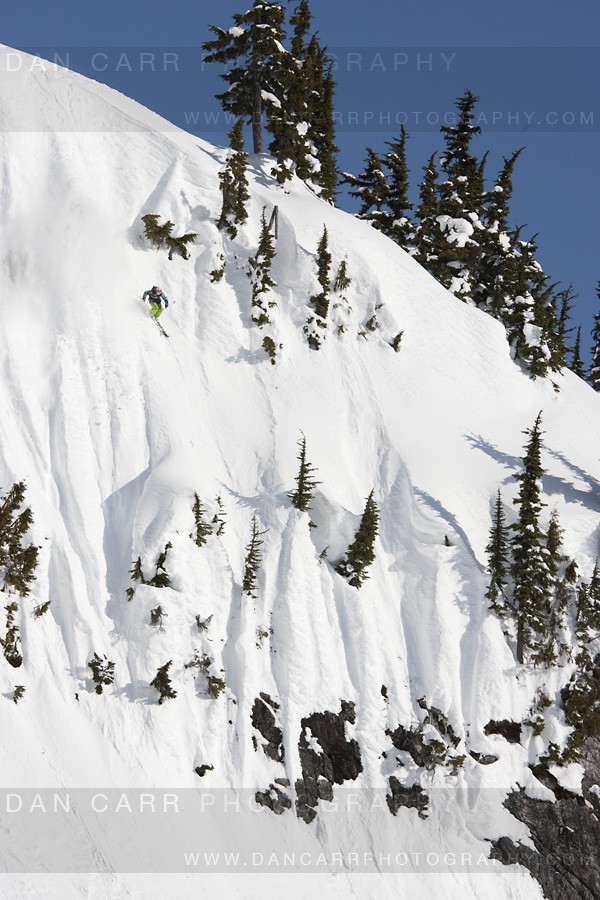
Those of you who follow this blog will remember that a couple of weeks ago I sold my beloved 70-200 2.8 L IS lens. The lens that has shot the majority of my ski photos for the last few years. I replaced it with it’s smaller and lighter brother the 70-200 f4 L IS. Having spent a couple of weeks using it now I thought I would confirm my initial suspicions. I LOVE this lens. As I sold my old lens I have no way of doing any direct comparisons but if that’s what you want to see then check here.
At first I just couldn’t believe how small and light this thing felt compared to my old one. It weighs 760g compared with the 1470g of the 2.8 version but it feels even lighter and is fully half the diameter. The difference in the weight of my pack feels considerable and everything fits inside much better now since i don’t have to carry the frustratingly large hood for the 2.8. Below is a shot taken with this lens just yesterday in Whistler along with a 100% crop of the skier in the shot (Riley Leboe). Just take a quick look, it holds plenty of detail. So far no regrets, I have also picked up an 85mm 1.8 lens to fill the short tele large aperture gap that I had by selling the 2.8 and i’ll put that to the test very soon too. For now though, this is my new favorite lens!
Well as some of you know, I am originally from the UK. For a country that doesn’t really have any skiing of it’s own, there is a large and talented ski scene there and several great magazines. I often shoot stories for a magazine called Fall Line and this month I have an article about summer skiing in there with the added bonus of the cover photo too of rising UK star James Woods.
I think over the last 3 years, about 75% of the photos i have shot have been with the Canon 70-200 2.8 L IS. So today I sold it. Wait….what!??! Yep, it’s gone. You see I was thinking about it, when do I ever shoot that thing at 2.8? I’m always outside and 2.8 is quite a narrow DOF to hit a moving target with when you are not using auto focus (I don’t like using AF). The few times i did use it at wide’ish apertures where for portrait type stuff and then that was mostly at between 70mm and 90mm. Any more than 100mm with a aperture of 2.8 and at a distance to get head and shoulder shots of something and you are looking at a very thin DOF again which i tend to find a bit too thin to get all of someones face in focus. If i ever did shoot any lifestyle at longer lengths then i was stopping down to at least f6.4 or f7.1 to get every part of the person in focus. The shot on the right for example of Charley Ager taken yesterday. 200mm on my 2.8 with f6.4 was just enough to get him tack sharp all over and blow the background out nicely to get those backlit snowflakes to show up.
Just over a year ago Canon announced the 70-200 f4 L IS. Unbelievably they were tested by many of the leading websites and magazines and found to be even sharper than their f2.8 brother. BUT they are half the weight, half the diameter and even an inch shorter. For someone like me who is often skiing with a lot of gear on my back, any weight reduction is a blessing and as you may have guessed by now I have purchased one of these 70-200 f4 ISs. It was actually even $300 cheaper than my used f2.8 lens sold for so I have money in my pocket, 750g less weight on my back and an even sharper lens than i had before. Actually what I am going to do with the $300 is buy an 85mm 1.8. As I mentioned , when i did use my old lens wide open it was in that shorter range so the 85mm 1.8 will give me that option and being a prime not a zoom, will do it with even sharper results and also with a 1-stop advantage allowing me a very narrow DOF if i need it or ability to shoot in even lower light. It was sad to see my old 2.8 go, it has been responsible for most of my favorite images and travelled with me faithfully for so long but i think this new combination just makes more sense for me.
Well those of us living up in BC have been waiting patiently for this all winter. The snow has now been falling for a few days and today was probably the deepest day I have ever seen when i headed up with the Poorboyz crew with Charley Ager and Brandon Kelly as they shoot for their new movie Every Day Is a Saturday. It made it almost impossible to make any headway with out sleds and even the tree skiing we shot was tough as the depth of the snow made it hard for the guys to keep momentum going! It’s due to snow for the rest of the week too, looks like we will have a spring ski season after all…..
Charley Ager enters the whiteroom:
Charley and Brandon Kelly doubling up to the lines on the sleds:
This is a quick post but while the weather is bad here i’ve been working on learning some new skills. I decided to learn how to make 360 degree sperical panoramas. Here is a link to the first one that I tried out, click and drag with the mouse to view the room. Created using 8 photos. 6 photos from left to right to make up 360 degrees , and then one photo straight up and one straight down. Stitched together using a program called PTGui with a bit of time and patience….. Shot with a Canon 5dMKII ( though the resolution if it is overkill, the full frame is important) and a Sigma 15mm fisheye. You need to make a few modifications to your tripod setup though so the camera rotates around the lens’ nodal point (or no-parralax point depending on who you ask)
Always good to have new skills to fill in your spare time, you never know when this will come in handy.
Ok guys, you asked for it….. I’m always getting people wandering about the gear I use so without further delay here is part 1. A quick video to show you my lighting kit in my Pelican 1610 case. Below is also a list of whats in the case and some photos too. Bonus!
I got an e-mail this morning from Frank Raymond to say that I had the cover of the Skieur magazine in France. The photo was shot last winter in the Whistler backcountry with the Theory-3 crew while filming for their movie ” The Journal”. You can see another version of the shot from the magazine scan I posted from the Norweigen magazine yesterday. They are actually 2 different shots, I figured it would be nice to have a portrait and a landscape version of the shot so Joe did this trick a few times. It was a great day for shooting photos, the shot is actually taken shooting almost straight into the sun but there was a thin layer of cloud in front of it. It turned the whole alpine into a giant softbox so the highlights weren’t too harsh and I could still bring out detail in Joe even though he was backlit. Shot with a Canon 1dMKIIN, 70-200 2.8 L IS at 90mm , 1/1000, f8.0 ISO 200.
One off shots in magazines are nice, but i’ts even nicer when you get a collection of shots together for an article. Last month Fri Flyt , one of the major ski mags in Norway, ran a few of shots of mine in an article about filming in Whistler with Theory-3 media. The article was written by a good friend of mine, Andreas Amble. Check out his blog here. He is also a very talented graphic designer. Check out Theory-3s movie “The Journal” in all good ski stores or pick it up online from the website linked above.
A couple of days ago we took some time off sledding here in Whistler with the PBP crew to shoot a jib setup that I had found before the season started. The setup was a double bomb drop, one drop followed immediately by another one into some trees. I thought i’d take a bit of time to go over my thought processes when i’m shooting something like this. Unfortunately I can’t show you the final shot from the shoot but you’ll see it soon enough….
One of the first things you want to remember with this stuff is to try and make the setup look good. Take the time to make things look nice for the cameras. In this case it was being filmed too so it needed to look neat and tidy but even if i’m just shooting stills , its a good idea to keep it clean and tidy. Put square edges on your jumps and landings and try not to put unnecessary footprints in the background. These things wont always end up in your shot but if you do the work beforehand, once you have started shooting you won’t have to stop halfway and fix something up just because you have changed angles.
Next up, pick an angle or two. Normally I find there is one angle that jumps out at me as “The one”. I’ll fire off a couple of test shots shutter priority set to 1/320 (max sync speed on my canon 1DMKIIN) so I can get an idea for the angle and also what the exposure is going to be. Then I’ll stick the camera in Manual at 1/320 and guestimate f-stop for the ambient exposure i’m going to need to underexpose by a stop or two in order to stop ghosting. The exact amount or underexposure really depends on how much ambient is hitting the feature , in this case the rock was actually pretty well shaded so i hardly needed to underexpose the sky by much at all and the rock was almost totally dark. We were also shooting at the end of the day so the sky had a nice deep color to it.
Now I know what my exposure setting is going to be it’s time to get out some lighting kit. I shot this with 4x Nikon sb80DXs and one Elinchrom Ranger RX. The SB80s were on dual brackets with each pair fired by one pocketwizard. Note though that just because they are on the same bracket doesnt mean they have to be aimed at the same subject… In the final scenario here, all 4 SB80s were aimed at different points by swiveling their heads around. The next two photos show some of the differences that light placement can make. The first setup had the ranger behind me, 2 SB80s on the left firing up at where the rider would be and then 2 more SB80s on the right firing up at the rider. This looked pretty crap though, not enough contrast in that rock and just pretty dull looking. The ranger was pointing far too close to the same direction as the camera was so there were very little shadows cast on the rock and the moss. FAIL.
For the second setup I moved the Ranger over to the right (you can see the flare from it in the second shot below. That created some nice contrast in the snow on the rock now and a great reflection in the wet rock on the bottom right (compare the two!). I then aimed one of the SB80s on the left at the rock as there was no longer any light on that side of the rock. The second SB80 from that bracket was zoomed to 105mm and pointed at the spot in the air where i wanted the rider to be. The second pair of SB80s was positioned behind me. One was zoomed to 70mm and aimed at the skier (not 105mm like the other one as this one was closer to the rider) and the second was left wide at 17mm filling in the front of the rock slightly. The third shot below shows the view from above down to the landing and gives you some idea of the distances involved. The Ranger is much further back as it is way more powerful. For the fastest flash duration on a Ranger you have to have it at full power so it needs to be set back quite a long way in order to get the same exposure as the SB80s
Now we’re getting somewhere. I got one of the riders to stand on top so I can get a feel for the shot and make some fine adjustments to the lighting. Have them throw a snowball so you can see the trajectory and then you are good to go! All of the flashes I was using have a fast flash duration at full power, fast enough that I can confidently leave them at full power for most things as in this case. Then all you have to do to adjust your exposure is alter the distances that the flashes are from the subject or use the zoom function on the flash head if it has one. Doing this quickly is just a matter of practice, I don’t use a light meter for any of it. After a while you’ll be able to get your exposures and distances pretty dead on very quickly.
Time to drop! Video courtesy of Jeff Thomas/Poorboyz Productions.
Once I have the strobes where I want them for the shoot I tend not to move them until I have the shot I want fromt that angle. What you will normally find though is that there are some good lifestyle oppertunities as the riders go about doing there thing. The exposure for my shot was going to be f10, 1/320 at iso 200. That would properly expose the rock and the rider for the action shot but by following the riders round with a longer lens and simply adjusting the aperture as they got further away from the strobes, you can usually grab a couple of lifestyles if you are quick. These 2 shots of Dane Tudor and Charley Ager were shot entirely by using the lighting setup fot the action shot. Nothing was planned, I simply reacted to where they were and quickly adjusted the exposure.
UPDATE: September 20th 2009.
So when i wrote this post, I couldn’t show you any of the action shots from the shoot. I needed to wait and find out if any of them were going to get used for commercial uses or in magazines. As it happens, the best shot from this shoot was picked up by Salomon to use as an international advert for one of their new skis, the Suspect, and you might also see it crop up as a poster for one of their top skiers, Dane Tudor.
Recent Comments