
When Canon launched the 5dMKII in late 2008 , the quality and look of the video it produced was lost on nobody. It changed everything, Fast forward now to 2010 and I am updating my original posting on microphones for the 5dmkII because it’s popularity has gone from strength to strength. The final episode of the worlds most watched TV show(in 2010), House, was just shot entirely using the Canon 5dMKII. And what is even crazier about the whole story, is that Canon had seemingly no idea of the potential of this camera when they released it. They never intended it to be used for shooting Hollywood movies or TV shows with per-episode budgets of more than 10 million dollars. The problem that faces us as filmmakers and photographers is that Canon wrapped this video package up in a camera that really lacked the ergonomic features of a professional video camera and the first hurdle is the quality of the sound.
The AGC Issue
On its original release Canon implemented what is known as AGC in the sound recording of the 5dMKII. Automatic Gain Control. This automatically adjusted the record levels from either the on-board mic, or any microphone plugged into the 1/8″ mic input on the side. The problem was that when sound dipped to a low level in the scene that you were shooting, the ACG cranked the audio gain up very high “seeking” for sound. This produced a very noticeable “hissing” noise in the audio track. It didn’t matter what the quality of your microphone was, it happened to everyone. For a year people struggled to find ways to overcome this deficiency. Eventually several companies came up with ways to defeat the AGC using additional hardware and just recently Canon finally released another firmware upgrade that enabled manual audio setting on the camera. We are finally starting to get there with what we need to have professional sounding audio on this camera.
On-board or Separate audio ?
One option that people quickly adopted was to record the audio separately, just as people do in the motion picture industry. This leaves the audio recording up to a machine that is designed specifically for that purposed, and unquestionably delivers the highest quality result. But it introduces an extra step into post production as you need to sync the separate audio track with the video track, not to mention the extra care needed during production to ensure that all your audio tracks are recorded and stored/logged in a way that you can easily find them for post-production. So a decision has to be made at some point whether you are going for absolute quality, or simplicity, and that will likely come down to the size of your production. If you are a photojournalist shooting “run & gun” video clips for news sites then you likely dont want the hassle of externally recorder audio. But if you have an indie production with a crew of 10 people, then sure why not have a guy dedicated to audio capture. Of course even if you have an audi recording device, you still need to plug microphones into that too. So below I’m going to cover the most popular choices for microphones for this camera. Its also worth noting that this information is also totally relevant to Canons other cameras, the 7d and the 1dMKIV as well as the Nikon D3. But these cameras do still maintain an AGC circuit so take that into account.
Sennheiser MKE400

This is one of the most compact options for improving your audio. The metal body of the MKE400 has a solid feel to it and if you are a stills photographer primarily, you can easily fit this microphone into you existing camera bag without noticing. It runs on a standard AAA battery and from that you will get 300 hours of recording. There is a switch on the body that allows you to switch sensitivity from long, to short distance and it has an integrated shock absorbing mount. The beauty of this microphone is really it’s simplicity. You can easily attach it to your hot-shoe and plug it directly into the microphone input on the side of your Canon DSLR. It’s diminutive size and weight means handling of the camera is not affected at all and it will provide a noticeable improvement in the quality of your audio. I know several adventure photographers using this microphone for its combination of small size and simple connection to the camera. I would really recommend this microphone to a photographer who is looking to create a few extra videos on top of their still photography work. It is perfect for making those “behind-the-scenes” type video but if you want to use it outside, make sure you get the additional “dead cat” accessory. If you are solely looking to produce videos with your camera then you will probably want to look a little further down this list.
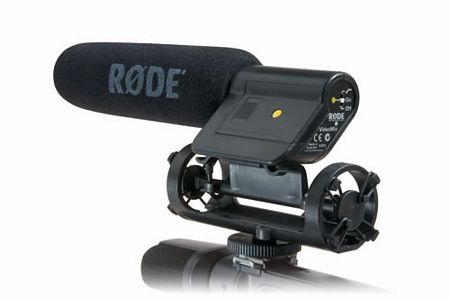
Rode Videomic

The Rode Videomic is one of the most often recommended microphones for DSLR video making on a small scale. Physically it is more than twice the size of the tiny Sennheiser MKE400 but it is still manageable as a hot-shoe mounted accessory as it does not weigh too much. In the hand it feels a lot more fragile than the metal-bodied MKE400 and the shock absorbing mount whilst being more effective, is also bulkier and again more fragile. With the smaller Sennheiser you could pack it and forget it in a typical photographers bag, but not so with the Rode Videomic. It needs more careful transportation and more space in your kit. This is an ideal microphone for someone making videos by themselves, or someone who is evenly splitting their work between video and stills production. The sound quality is an improvement on the MKE400’s and a huge improvement over the audio from the cameras built in microphone. It is a shotgun microphone, meaning that the sound recording is directional which makes it great for capturing interviews and leaving out unwanted background noise. The whole thing runs on a 9v battery and connects to your camera via the 1/8″ microphone input while only setting you back approximately $150. An absolute bargain for the improvement in audio that it offers.
Rode Stereo Videomic

The Stereo Videomic from Rode is another step up the ladder but with a few differences. It’s priced a bit higher than the great-valued videomic but this is reflected in the metal bodied construction which feels like it could really stand up to some serious usage. Again it comes with a shoe mount and delivers sound to your camera via the 1/8″ mini jack on the side. The main difference though is the implementation of an XY stereo microphone pattern, instead of a condenser microphone. This means that the sound that it picks up is less dependent on the direction that the microphone is facing. If you only intend to shoot interviews then a shotgun mic would probably be a better bet for you. But if you want to shoot events such as parties, musical events or general travel video where ambient sound is important, then the stereo mic will be a great option and the separation between left and right channels is nice to have for ambient noises. On the back of the mic there is -10db pad to eliminate distortion and also a high-pass filter which will cut down on some ambient room noise if you are shooting someone talking in front of the camera. Size relative to the shotgun videomic they are about the same, but the stereo mic weighs a little more though still comes in at a modest 12oz.
Zoom H1 Audio Recorder

The Zoom H1 is a new addition to my recommended lineup. Announced in June 2010 and set for a scheduled availability of July 2010. I posted some notes on the camera after its announcement here. With the Zoom H1 we are starting to transcend the gap between on-board and separately recorded audio because in that tiny, beautifully designed package you actually have the ability to do both. Impressive for a device that only costs $99. The H1 has an XY stereo configuration similar to that which is hidden inside the Rode Stereo Videomic. It captures lovely ambient noises with this built in microphone but also has a 1/8″ microphone input, into which you can attach any of the above mentioned microphones to suit your shooting situation. Because it is a standalone recorder you can position it anywhere away from the camera wile it is recording, but you will need to sync the audio track in post production. This is the first step towards getting truly professional sounding audio though. What is really great about the H1 though, is that you also have the option to record the sound directly to your camera just as you can with all the microphones already mentioned above. You simply run a stereo cable from the output of the H1, into the mic input on your camera. So with this you have the best of both worlds. The option to go separate when you have the time to do so, and the option to go with a more “run and gun ” style when you need to deliver a final video on a deadline. There is also an advantage to doing both at the same time. Recording the audio to the H1 and ontot the camera at the same time means that when you come to sync the tracks in post, you have a very clean track already embedded into the video. This makes it much easier to sync the higher quality track from the H1. You also have a great little ambient stereo recorder if you are a stills photographer of journalist wishing to put together a multimedia slideshow of some sort.
Zoom H4N Handy Recorder

Another step up the ladder and we get to the Zoom H4N recorder. This takes all the features of the H1 and then adds a ton more, as well as 2 XLR inputs for professional grade audio gear. Whilst you can record directly to the camera using the H4N, it really comes into its own when used as a separate recorder. The built-in stereo microphones capture beautifully toned audio and work very well for ambient noise, and even interviews where the subject is close to the recorder. But the main reason you would upgrade to an H4N is that it is capable of 4-track recording, mixing the on-board mic with up to 2 more microphones plugged in via XLR inputs. So you could simultaneously record audio from say a shotgun mic, a lapel mic on an interviewee and the internal mic and mix the whole lot down to a stereo track that you can sync to your video in post production. You can also choose to disable the on-board mic and just go with what you have plugged in to the XLR ports too. The H4N has more options that you will probably ever learn how to use and allows recording of audio in several formats and bit-rates to suit your needs. Lots of people are using the H4N plugged directly into the camera for quick audio improvement directly onto the video track. The built in XY stereo mic is leagues ahead of the mic inside the camera. But then when you want to break out and do separate audio, you can plug in all sorts of XLR mics and mix them all to your liking within the menu system of the H4N whilst monitoring the recording through the headphone output. This is another advantage, the Canon DSLRs give you no way to monitor the audio that you are recording. For the features this unit provides, it is a steal at $300 and there is a good reason why these have been selling like hot-cakes since the introduction of the 5d.
Rode NTG-2 Shotgun

If you really want to step into the world of professional audio then you are going to be looking at microphones that use the pro standard XLR cables. None of the current Canon cameras have XLR inputs on them so if you go down this route then you will either need something like the fantastic Zoom H4N detailed above, or one of the XLR mixers detailed a little bit further down the page. Once you step into the XLR arena you will notice a slight price increase, but with it comes the solidity that you would hope for in a pro-grade product, especially with the Rode mics. Still at the lower end of the XLR spectrum in terms of price, the NTG-2 is a real workhorse mic that provides excellent value for money. It can either be battery powered or phantom powered there are some good value starter kits out there for it which include all the necessary clamps, dead cats and rubber mounts. In physical terms it is still pretty small though and perfectly usable mounted to the top of the camera with something like a Juicedlink on the bottom of the camera. I would recommend this to someone making documentary or news style productions if they are working on their own because the size and weight of the mic is not prohibitive. There is also an even smaller NTG-1 version that lacks the NTG-2′s ability to be powered by 1 AA battery. Personally I think the slightly larger size of the NTG-2 is worth it to keep it compatible with any setup.
BeachTek DXA-5Da

The BeachTek DXA-5Da is a microphone control system that was designed specifically with DSLR video making in mind. It attempts to fill in all the gaps left by Canon and provide professional sounding audio right onto the video track that is recorded in camera. As you can see from the photo on the left it has 2 XLR inputs for attaching whatever microphone suits the occasion. It also has a screen to show you the recording levels from the 2 inputs and has a headphone monitor so that you can hear what you are getting. It does not have any sort of internal recording system like the Zoom H4N, it needs to be plugged into the camera in order to record the audio. This makes it way less complicated during editing, as the audio is there already but you lose some of the freedoms of placement you get by having a totally separate system. If you are trying to make a professional level production with a small crew, or even on your own then something like the BeachTek or the Juicedlink will go a long way to simplifying the process. The DXA-5Da also contains a system that defeats the AGC in the Canon cameras. This is a must have feature if you are shooting audio straight on to the 7d or the 1dmkIV but less so on the 5d now that it has manual audio controls anyway via firmware upgrade. Still though, it allows you to leave the 5d audio set to auto and that saves you having to mess around in the menu system calibrating the manual levels. Still a nice feature to have. In terms of quality, its generally regarded that the similar Juicedlink DT454 sounds a little bit better than the BeachTek but it does cost more than $100 more. Also worth noting is that the DXA-5Da does not have phantom power which means that your XLR microphones will have to come with their own power supply, whilst the DT454 has phantom power built in.
Juicedlink DT454

The Juicedlink DT454 is similar in function to the above mentioned BeachTek, albeit in a package that doesn’t immediately look quite so aesthetically appealing. It’s worth nothing that you don’t have to mount these things underneath your camera as they are in the photos, they can just as easily be attached to a shoulder rig or something like that. The DT454 includes phantom power unlike the DXA-5Da but other than than the feature list is basically the same. AGC disable, 2 XLR inputs, recording level lights, headphone monitor port. The DT454 also adds the ability to mix in 2 more microphones via 1/8″ jacks so you can effectively mix up to 4 mic inputs down into the stereo output. The DT454 is more expensive than the Beachtek, but it does deliver a cleaner sound. As a nice extra feature, one of the 1/8″ inputs can also be used as a playback monitor so you can listen to the sound after you have recorded it by running a cable from the camera output into the DT454 and monitoring the recorded audio via the headphone monitor.
PluralEyes and DualEyes

If you decide to go down the separate audio route then you can save yourself hours of work by budgeting this handy piece of software into the equation. PluralEyes from Singular Software is a plug-in for Final Cut,Vegas or Premiere that automates the process of syncing your separately recorded audio track, and your video track. It can literally save you hours on every shoot you do. Well worth the $150 asking price. NB : Singular has also just released information on a new standalone program called DualEyes. This program runs on its own, not as part of Final Cut which means that you do not need to be a pro who is editing with pro software. Now you can edit your footage in iMovie or another consumer product , but still have the sound quality that separate recording affords. There is a nice demo of DualEyes posted on the Singular website and if you are interested it is well worth a look. Audio recording and syncing can sound like a huge and daunting task, but the guys at Singular seem dedicated to making this procedure as simple as possible.
If you are looking for a good way to mount various audio devices to you DSLR then you should also check out my review of the IKAN Cheese Stick JR and 10″ Articulating Arm HERE. With these 2 products you can easily mount a shotgun mic or lavalier receiver to your camera, as well as LCD monitors.

