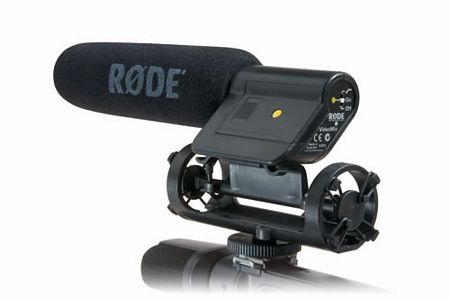
5d-with-rode-micWhen Canon launched the 5dMKII in late 2008 , the quality and look of the video it produced was lost on nobody. It changed everything, Fast forward now to 2010 and I am updating my original posting on microphones for the 5dmkII because it’s popularity has gone from strength to strength. The final episode of the worlds most watched TV show(in 2010), House, was just shot entirely using the Canon 5dMKII. And what is even crazier about the whole story, is that Canon had seemingly no idea of the potential of this camera when they released it. They never intended it to be used for shooting Hollywood movies or TV shows with per-episode budgets of more than 10 million dollars. The problem that faces us as filmmakers and photographers is that Canon wrapped this video package up in a camera that really lacked the ergonomic features of a professional video camera and the first hurdle is the quality of the sound.

The AGC Issue

On its original release Canon implemented what is known as AGC in the sound recording of the 5dMKII. Automatic Gain Control. This automatically adjusted the record levels from either the on-board mic, or any microphone plugged into the 1/8″ mic input on the side. The problem was that when sound dipped to a low level in the scene that you were shooting, the ACG cranked the audio gain up very high “seeking” for sound. This produced a very noticeable “hissing” noise in the audio track. It didn’t matter what the quality of your microphone was, it happened to everyone. For a year people struggled to find ways to overcome this deficiency. Eventually several companies came up with ways to defeat the AGC using additional hardware and just recently Canon finally released another firmware upgrade that enabled manual audio setting on the camera. We are finally starting to get there with what we need to have professional sounding audio on this camera.

On-board or Separate audio ?

One option that people quickly adopted was to record the audio separately, just as people do in the motion picture industry. This leaves the audio recording up to a machine that is designed specifically for that purposed, and unquestionably delivers the highest quality result. But it introduces an extra step into post production as you need to sync the separate audio track with the video track, not to mention the extra care needed during production to ensure that all your audio tracks are recorded and stored/logged in a way that you can easily find them for post-production. So a decision has to be made at some point whether you are going for absolute quality, or simplicity, and that will likely come down to the size of your production. If you are a photojournalist shooting “run & gun” video clips for news sites then you likely dont want the hassle of externally recorder audio. But if you have an indie production with a crew of 10 people, then sure why not have a guy dedicated to audio capture. Of course even if you have an audi recording device, you still need to plug microphones into that too. So below I’m going to cover the most popular choices for microphones for this camera. Its also worth noting that this information is also totally relevant to Canons other cameras, the 7d and the 1dMKIV as well as the Nikon D3. But these cameras do still maintain an AGC circuit so take that into account.

For an easy way to check prices on the following gear, check out this customized price list at B&H !

Sennheiser MKE400

sennheiser_mke400This is one of the most compact options for improving your audio. The metal body of the MKE400 has a solid feel to it and if you are a stills photographer primarily, you can easily fit this microphone into you existing camera bag without noticing. It runs on a standard AAA battery and from that you will get 300 hours of recording. There is a switch on the body that allows you to switch sensitivity from long, to short distance and it has an integrated shock absorbing mount. The beauty of this microphone is really it’s simplicity. You can easily attach it to your hot-shoe and plug it directly into the microphone input on the side of your Canon DSLR. It’s diminutive size and weight means handling of the camera is not affected at all and it will provide a noticeable improvement in the quality of your audio. I know several adventure photographers using this microphone for its combination of small size and simple connection to the camera. I would really recommend this microphone to a photographer who is looking to create a few extra videos on top of their still photography work. It is perfect for making those “behind-the-scenes” type video but if you want to use it outside, make sure you get the additional “dead cat” accessory. If you are solely looking to produce videos with your camera then you will probably want to look a little further down this list.

Rode Videomic

rode_videomicThe Rode Videomic is one of the most often recommended microphones for DSLR video making on a small scale. Physically it is more than twice the size of the tiny Sennheiser MKE400 but it is still manageable as a hot-shoe mounted accessory as it does not weigh too much. In the hand it feels a lot more fragile than the metal-bodied MKE400 and the shock absorbing mount whilst being more effective, is also bulkier and again more fragile. With the smaller Sennheiser you could pack it and forget it in a typical photographers bag, but not so with the Rode Videomic. It needs more careful transportation and more space in your kit. This is an ideal microphone for someone making videos by themselves, or someone who is evenly splitting their work between video and stills production. The sound quality is an improvement on the MKE400′s and a huge improvement over the audio from the cameras built in microphone. It is a shotgun microphone, meaning that the sound recording is directional which makes it great for capturing interviews and leaving out unwanted background noise. The whole thing runs on a 9v battery and connects to your camera via the 1/8″ microphone input while only setting you back approximately $150. An absolute bargain for the improvement in audio that it offers.

Rode Stereo Videomic

stereovideomicThe Stereo Videomic from Rode is another step up the ladder but with a few differences. It’s priced a bit higher than the great-valued videomic but this is reflected in the metal bodied construction which feels like it could really stand up to some serious usage. Again it comes with a shoe mount and delivers sound to your camera via the 1/8″ mini jack on the side. The main difference though is the implementation of an XY stereo microphone pattern, instead of a condenser microphone. This means that the sound that it picks up is less dependent on the direction that the microphone is facing. If you only intend to shoot interviews then a shotgun mic would probably be a better bet for you. But if you want to shoot events such as parties, musical events or general travel video where ambient sound is important, then the stereo mic will be a great option and the separation between left and right channels is nice to have for ambient noises. On the back of the mic there is -10db pad to eliminate distortion and also a high-pass filter which will cut down on some ambient room noise if you are shooting someone talking in front of the camera. Size relative to the shotgun videomic they are about the same, but the stereo mic weighs a little more though still comes in at a modest 12oz.

Zoom H1 Audio Recorder

zoom_h1The Zoom H1 is a new addition to my recommended lineup. Announced in June 2010 and set for a scheduled availability of July 2010. I posted some notes on the camera after its announcement here. With the Zoom H1 we are starting to transcend the gap between on-board and separately recorded audio because in that tiny, beautifully designed package you actually have the ability to do both. Impressive for a device that only costs $99. The H1 has an XY stereo configuration similar to that which is hidden inside the Rode Stereo Videomic. It captures lovely ambient noises with this built in microphone but also has a 1/8″ microphone input, into which you can attach any of the above mentioned H1-DLSR-T2i-back_no_wire-web-162x300microphones to suit your shooting situation. Because it is a standalone recorder you can position it anywhere away from the camera wile it is recording, but you will need to sync the audio track in post production. This is the first step towards getting truly professional sounding audio though. What is really great about the H1 though, is that you also have the option to record the sound directly to your camera just as you can with all the microphones already mentioned above. You simply run a stereo cable from the output of the H1, into the mic input on your camera. So with this you have the best of both worlds. The option to go separate when you have the time to do so, and the option to go with a more “run and gun ” style when you need to deliver a final video on a deadline. There is also an advantage to doing both at the same time. Recording the audio to the H1 and ontot the camera at the same time means that when you come to sync the tracks in post, you have a very clean track already embedded into the video. This makes it much easier to sync the higher quality track from the H1. You also have a great little ambient stereo recorder if you are a stills photographer of journalist wishing to put together a multimedia slideshow of some sort.

Zoom H4N Handy Recorder

h4nAnother step up the ladder and we get to the Zoom H4N recorder. This takes all the features of the H1 and then adds a ton more, as well as 2 XLR inputs for professional grade audio gear. Whilst you can record directly to the camera using the H4N, it really comes into its own when used as a separate recorder. The built-in stereo microphones capture beautifully toned audio and work very well for ambient noise, and even interviews where the subject is close to the recorder. But the main reason you would upgrade to an H4N is that it is capable of 4-track recording, mixing the on-board mic with up to 2 more microphones plugged in via XLR inputs. So you could simultaneously record audio from say a shotgun mic, a lapel mic on an interviewee and the internal mic and mix the whole lot down to a stereo track that you can sync to your video in post production. You can also choose to disable the on-board mic and just go with what you have plugged in to the XLR ports too. The H4N has more options that you will probably ever learn how to use and allows recording of audio in several formats and bit-rates to suit your needs. Lots of people are using the H4N plugged directly into the camera for quick audio improvement directly onto the video track. The built in XY stereo mic is leagues ahead of the mic inside the camera. But then when you want to break out and do separate audio, you can plug in all sorts of XLR mics and mix them all to your liking within the menu system of the H4N whilst monitoring the recording through the headphone output. This is another advantage, the Canon DSLRs give you no way to monitor the audio that you are recording. For the features this unit provides, it is a steal at $300 and there is a good reason why these have been selling like hot-cakes since the introduction of the 5d.

Rode NTG-2 Shotgun

Rode_NTG2If you really want to step into the world of professional audio then you are going to be looking at microphones that use the pro standard XLR cables. None of the current Canon cameras have XLR inputs on them so if you go down this route then you will either need something like the fantastic Zoom H4N detailed above, or one of the XLR mixers detailed a little bit further down the page. Once you step into the XLR arena you will notice a slight price increase, but with it comes the solidity that you would hope for in a pro-grade product, especially with the Rode mics. Still at the lower end of the XLR spectrum in terms of price, the NTG-2 is a real workhorse mic that provides excellent value for money. It can either be battery powered or phantom powered there are some good value starter kits out there for it which include all the necessary clamps, dead cats and rubber mounts. In physical terms it is still pretty small though and perfectly usable mounted to the top of the camera with something like a Juicedlink on the bottom of the camera. I would recommend this to someone making documentary or news style productions if they are working on their own because the size and weight of the mic is not prohibitive. There is also an even smaller NTG-1 version that lacks the NTG-2′s ability to be powered by 1 AA battery. Personally I think the slightly larger size of the NTG-2 is worth it to keep it compatible with any setup.

BeachTek DXA-5Da

5d_with_camera_darker_25_496_450The BeachTek DXA-5Da is a microphone control system that was designed specifically with DSLR video making in mind. It attempts to fill in all the gaps left by Canon and provide professional sounding audio right onto the video track that is recorded in camera. As you can see from the photo on the left it has 2 XLR inputs for attaching whatever microphone suits the occasion. It also has a screen to show you the recording levels from the 2 inputs and has a headphone monitor so that you can hear what you are getting. It does not have any sort of internal recording system like the Zoom H4N, it needs to be plugged into the camera in order to record the audio. This makes it way less complicated during editing, as the audio is there already but you lose some of the freedoms of placement you get by having a totally separate system. If you are trying to make a professional level production with a small crew, or even on your own then something like the BeachTek or the Juicedlink will go a long way to simplifying the process. The DXA-5Da also contains a system that defeats the AGC in the Canon cameras. This is a must have feature if you are shooting audio straight on to the 7d or the 1dmkIV but less so on the 5d now that it has manual audio controls anyway via firmware upgrade. Still though, it allows you to leave the 5d audio set to auto and that saves you having to mess around in the menu system calibrating the manual levels. Still a nice feature to have. In terms of quality, its generally regarded that the similar Juicedlink DT454 sounds a little bit better than the BeachTek but it does cost more than $100 more. Also worth noting is that the DXA-5Da does not have phantom power which means that your XLR microphones will have to come with their own power supply, whilst the DT454 has phantom power built in.

Juicedlink DT454

canon_5d_dt454_d_60_s_411_427The Juicedlink DT454 is similar in function to the above mentioned BeachTek, albeit in a package that doesn’t immediately look quite so aesthetically appealing. It’s worth nothing that you don’t have to mount these things underneath your camera as they are in the photos, they can just as easily be attached to a shoulder rig or something like that. The DT454 includes phantom power unlike the DXA-5Da but other than than the feature list is basically the same. AGC disable, 2 XLR inputs, recording level lights, headphone monitor port. The DT454 also adds the ability to mix in 2 more microphones via 1/8″ jacks so you can effectively mix up to 4 mic inputs down into the stereo output. The DT454 is more expensive than the Beachtek, but it does deliver a cleaner sound. As a nice extra feature, one of the 1/8″ inputs can also be used as a playback monitor so you can listen to the sound after you have recorded it by running a cable from the camera output into the DT454 and monitoring the recorded audio via the headphone monitor.

PluralEyes and DualEyes

mainProduct copyIf you decide to go down the separate audio route then you can save yourself hours of work by budgeting this handy piece of software into the equation. PluralEyes from Singular Software is a plug-in for Final Cut,Vegas or Premiere that automates the process of syncing your separately recorded audio track, and your video track. It can literally save you hours on every shoot you do. Well worth the $150 asking price. NB : Singular has also just released information on a new standalone program called DualEyes. This program runs on its own, not as part of Final Cut which means that you do not need to be a pro who is editing with pro software. Now you can edit your footage in iMovie or another consumer product , but still have the sound quality that separate recording affords. There is a nice demo of DualEyes posted on the Singular website and if you are interested it is well worth a look. Audio recording and syncing can sound like a huge and daunting task, but the guys at Singular seem dedicated to making this procedure as simple as possible.

If you are looking for a good way to mount various audio devices to you DSLR then you should also check out my review of the IKAN Cheese Stick JR and 10″ Articulating Arm HERE. With these 2 products you can easily mount a shotgun mic or lavalier receiver to your camera, as well as LCD monitors.

Please also have a look at PART II of my accessory guide which takes a look at video tripod heads.

For more articles and reviews check out the index page.

The day that this town has been waiting for finally arrived.  I’m going to keep this post short, it speaks for itself.  Were the conditions great up there? No , far from it.  Was it great to be back on skis?  Ohhhhh yes.  Judging by the height of the snow pack , we are still a couple or three weeks from being ready to get go filming and shooting round here but it’s on its way.  The new Peak to Peak gondola system is an incredible feat of engineering and I will be attending the official opening on December 12th.  The new gondola station for it on Whistler is almost as large as the restaurant complex!

It’s not always about the action shots, this shot is one of my favorites from a day in Vancouver with Anthony Boronowski last year (click to see it larger).  It had been a long time since Anthony had done a lot of urban and yet here he was trying to get his 270 on.  There’s so many little thing in this shot that i love.  His expression says a lot but also the severe snow storm that was blowing at the time gives a nicely different look to the image.  The university buildings emerging from the gloom in the background look ominous and you can even see Jeff Thomas from Theory-3 media standing on the roof of the building with his camera ready.  This one shot sums up a whole day; cold, wet, windy and damn hard work.  Making movies isn’t easy.

Strobist info::

The shot was taken with a Canon 1dMKIIN at 1/250, f6.1 and 17mm with a 17-40 f4.0L.  Lighting comes from 4 different sources.  At the bottom of the stairs just out of the left side of the frame is an Elinchrom Ranger on full power on top of an 8ft light stand with a sports reflector on it.  At the top of the stairs just ouf of the frame past the right hand railing is 2 X Vivitar 285s both on half power and running off one pocketwizard.  At my feet is another 285 on half power and on camera is also a Canon 580EX angled about 45 degrees to the left.  The transmitter pocketwizard is attached via a PC cord in this case as the hotshoe is taken up by the canon flash.

Anyone that has ever used a DSLR outside in bright sunshine knows that it can sometimes be tough to see the LCD on the back of the camera.  Yes you can get a rough idea whats going on but when you are trying to check critical focusing or exposure with the histogram it can be tricky and I normally resort to unzipping my jacket and trying to view it inside, or removing my jacket and throwing it over my head if its a bright day.  When you have miles of snow surrounding you on all sides, each flake seemingly reflecting the sunshine directly at your LCD it can prove very annoying!  But not any more……

I recently picked up a newly updated version of the Hoodloupe Professional from the US company Hoodman who specialise in screen shades for a variety of photographic and video applications.  The new version fits up to a 3″ screen and provides the perfect solution to my problem.  The Hoodloupe can be worn around the neck, and when it is time to review your shot simply place it over the screen and look through the adjustable eyepiece.  The optics are crystal clear  and really allows you to check your framing and exposure as if you were in a darkened room.  Its is coated in a layer of grippy rubber and feels solidly made but also very lightweight.  When its not in use it also comes with a very nice, thickly padded case so you can stuff it in your pack and not worry at all about damaging it.  The eyepiece has a smooth motion and works just like that of a pair of binoculars with a +-3 diopter to accomodate people with glasses.

Another useful application is to allow clients and art directors to view the shots you are getting.  Sometimes it is just not possible to set up a laptop for them to view the shots as you shoot them but offering them a look using the Hoodloupe instantly gives them an acurate idea of what you are capturing.  I always get comments on the usefulness of the Hoodloupe from my clients if they are on the shoot.

This shot is on the back cover of the December Issue of Freeskier.  It was shot in April on Blackcomb mountain in Whistler, BC during a shoot with Matchstick Productions.  To read the full story about the shoot you can read my article on Newschoolers.com here and as always, click the photo to view it larger.  The conditions for this shoot had been tough all week.  Unseasonably cold weather left the jump too hard to hit for a few days and it came right down to the last possible day before the MSP crew had to leave town.  Even then we only had a tiny window to shoot in.

The shot was taken with a Canon 1DMKIIN and a 70-200 2.8.  Exposure setting was f7.1 at 1/1250 and iso 160 with a focal lenght of 160mm

Jim Jannard, billionaire ex-owner of eye wear giant Oakley, announced today a new camera system that should give most professional photographers some considerable food for thought.  Jannard’s company, RED, has already caused quite a stir in the movie industry over the last couple of years with the introduction of what is widely held as the best digital cinema camera, RED One.  Today the company unveiled a new system that not only aims to continue their domination of digital cinema technology, but at the same time take the company into the world of high-end digital still photography.  Two industries that have recently taken some considerable steps towards each other with the advent of the Nikon D90 and Canon 5D MKII, the first SLR cameras to offer video capture as well as high quality photo capture.

So how does the new RED system differ from these two current offerings?  The system is modular, a central ” brain” unit can be purchased and then any number of compatible accessories attached to the “brain” in order to create the perfect camera for your needs.  This means that if you decide to upgrade your system, you don’t have to start from scratch every time.  Simply upgrade your “brain” to a bigger sensor if that’s what you desire, or select different add-ons to create a familiar camera but with an entirely new purpose.  No word yet on pricing for the accessories, but expect them to to be at least half the price again of the Scarlet brain.

The “brain” comes several in versions, based around two main bodies, the Scarlet and the Epic. Specifications can be found in the table below.  Thankfully for us they have included the ability to use current Canon and Nikon lenses on some of the bodies so our existing lens collections are still useful. The S35 provides a sensor that is slightly larger than current APS-C sensors and will shoot at 30FPS for a cost of $7000.  The FF35 Scarlet provides a full frame body with a 24 megapixel sensor capable of shooting still photos and video up to 30 FPS for $12,000.

Moving on up to the aptly titled Epic brain unit there are some simply mind-boggling number being thrown around.  The Epic S35 ($28,000)and FF35($35,000) will shoot 13 and 24 megapixel images respectively just like their little Scarlet brothers but both deliver this at a staggering 100 frames per second.  The Epic line is also continued further with the 645 delivering 42X56mm 65 Megapixel sensor at 50FPS.  Finally to top things out there is the Epic 617 with a 186X56mm 261 Megapixel sensor!!

But what does all of this mean for me and people like me in my industry?  RED is a proven quality in the cinema industry but this will be their first attempt at making a stills camera.  With the amount if development and experience behind the big two (Nikon and Canon) I think it would be foolish to assume a similar quality photo from the RED sensor, especially with regards to ISO performance and dynamic range.  It still seems to me that the Scarlet and Epic systems are targeting the film making audience a lot harder that the photographers out there.  From a size and ergonomics point of view the system appears large and unwieldy, especially compared to something like the 5dMKII.  There also seems to be many more attachments for film making and the lack of a hot-shoe in the design is troubling for someone like me who relies on remote strobe setups that need a hot-shot mounted trigger.  I also question whether I need to shoot at 30FPS, let alone 100FPS!!  Removing some of the skill from my work is not something I’m too keen on and the work load that would be generated by shooting 100 still shots every second is frankly quite scary, not to mention the storage space required.  Can you imagine sitting down and staring at that many nearly identical photos trying to choose the best one?

I guess the proof will be in the pudding as they say, but the question first is will the pudding be served at all?  The original RED Scarlet program was canned earlier in the year when Canon threw the 5dMKII curve ball.  Jannard’s team seem to have been caught off guard by that and went back to the drawing board to create a competitor.  With the cheapest of these new models coming in at roughly 3 times the cost of the new Canon camera though, you have to wander if they have achieved their goal or not?  I have no doubt that Canon is well into the R&D for their next camera and if they stay one step ahead of RED, we might be faced with a perpetual release of fancy looking 3d designs and ever changing specifications without ever seeing a resulting camera in our hands.  If they do hit the shelves I expect to see the indie film makers flocking to them, and probably even Hollywood for the larger sensor versions but photographers?  I’m not so sure, we need to see some photo examples first.  Its a hugely expensive system to buy into and with the price of other SLRs falling every year I think its going to be a tough sell to all but highly specialized photographers.

Yuta Ueno at Snowpark in New Zealand.  Canon 1dMKIIN, 36mm on a 17-40, 1/1250, f8.0

Over the last couple of years I have experimented with with several different ballheads and failed to find what I was looking for.  I don’t use a ballhead very often for my work but when i do need one, i need one that is going to be reliable in fairly hostile environments.  Last year I was let down by ballheads from other brands in key situations so I finally decided to bite the bullet and pick up an RRS BH-40.  At almost $400 its relatively expensive but hopefully this will be the last ballhead I have to buy for many many years.  The longest lens I will be using with this is a 300mm f4 (and more often a 70-200 2.8).  If you are using bigger lenses that this you might want to take a look at the larger BH-55.

A lot of the previous reviews of this head talk about the smoothness of the controls and the quality of the machining and frankly it is superb, it has to be seen to be believed.  Once you pick it up you cant help but turn it over and over in your hand marveling at the detailed design.  I promise you there will be no buyers remorse with this if you like your photography gadgets!

The head has a separate knob for adjusting the panning base and also one for adjusting the amount of drag on the main ball and all the controls operate in a smooth and precise manner with a very repeatable feel to the settings.  In use with a canon 1 series body and a 70-200 2.8 the head is rock solid and appears to dampen vibrations from shutter release very well.

A lot of the time the deciding factor for me when choosing between between several similar products is the size and weight, ounces add up!! This ballhead is load-rated at 18 pounds but weighs only 13 ounces compared to the similarly revered Markins M10 which weighs in at nearly 18 ounces.  That’s a very good ratio and it’s small form factor helps too when it comes to packing it in a backountry ski pack to take on a long days skiing, or squeezing into my carry-on case for flying with.

Currently the RRS products can only be purchased from their website so you will have to factor in some shipping costs wherever you live but they are very helpful to deal with.

When I drew back the curtains this morning at my house in Whistler, British Columbia this morning I was greeted with the site that I have been waiting for.  Snow.  Not just snow on the mountain peaks but snow in the valley, snow in my yard and snow on the trees.

This is where it begins.

© 2010 Dan Carr Suffusion WordPress theme by Sayontan Sinha