
Having different options for carrying a tripod on a pack designed for outdoor photography is very important. Often you’ll be carrying other items on the outside of the pack such as camping equipment, safety equipment, skis, a snowboard, light stands or multiple tripods. Being able to arrange these items to keep the largest masses as close to your centre of gravity, and to have a balanced load from left to right, is key for a comfortable day.
The BackLight Elite has three ways to carry a tripod, and during my two years of testing prototypes of this bag prior to its release, I made good use of all of them in different circumstances. Let’s take a look at them:
#1 – Side Carry (left or right)

The two sides of the BackLight Elite are identical, so what you see in the above image is simply replicated on the other side. This is my preferred method of carrying a tripod because it keep the weight close to your back, and if you use a lightweight carbon tripod (like my RRS TFC-24L Mk2 in the photo), it won’t throw your balance off too much even without something on the opposite side. Of course when I do have extra gear, perhaps a water bottle, or trekking poles, I do put them on the other side.

The stretchy pockets on the side are large enough for a pair of legs on even the biggest tripods, and then I hang the third leg outside to strap it down with the lower cinch strap. Importantly, the bottom of the mesh pocket is actually reinforced with nylon to prevent your tripod feet, or any other spiky objects from poking through it.
If you’re carrying a huge video tripod then a side carry option might just thrown your balance off too much, in which case you’ll want to consider the front straps on the bag instead.
#2 – Front Carry

A central carrying option is also provided on the Elite pack, and this is helped by the addition of a fold-away tripod cup at the base of the pack. I’ve used bags in the past that don’t give you a tripod cup and you end up hanging the tripod apex on the top compression strap with just pulls the bag’s front pocket down in an awkward manner. This doesn’t happen with the Elite when you use the cup, though.

The downside this carrying method is that, as you can see in the photo, the tripod impacts the ground first when you put the bag on the ground in an upright way. If you lay it down on its front, to access the rear panel of the bag, you’re also smushing your expensive tripod into the ground. Consider putting your tripod into something like the F-Stop tripod sleeve if you’re going to do that!
#3 – Tripod Suspension Kit
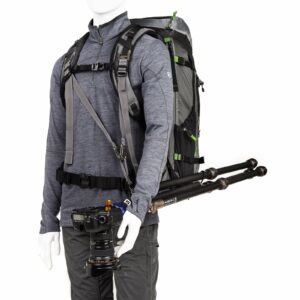
The Tripod Suspension Kit is an optional accessory that hangs the weight of your tripod on the shoulder straps. If you’re not covering rough terrain where your hands are needed for scrambling or holding poles, this is a comfortable way to carry your tripod.
The other major benefit is that you set up your tripod and camera without having to take your pack off. If you’re moving quickly from one shooting spot to the next, this is a handy time-saver.


