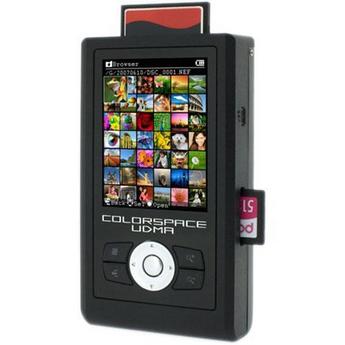
 This past Autumn I was in Mexico on holiday. I took my newly purchased Canon S90 camera with me and was having a great time snapping pics with that little thing. The quality of the shots coming out of that tiny thing was really blowing me away. I wasn’t traveling with a laptop computer so my photos remained on the camera’s memory card. Unfortunately, on the fifth day of my trip, my camera was stolen while I was in a restaurant. This was the first time I have ever lost photos and I was truly gutted, more so than I ever thought I would be. I didn’t give the camera a second thought, but all I could think about was all the photos I had just lost. When I got back home I started to look into some possible solutions to this problem in the future. Sometimes it’s just not practical to travel with a laptop, so how do you keep your photos safe?Several solutions exist, all similar in nature but wildly different in price. The one that caught my eye was the Hyperdrive Colorspace UDMA. Essentially a miniature computer containing a large capacity hard drive and several memory card readers, it offered several features that its more pricey competitors like the Epson p7000 didn’t. Not to mention much larger capacities. The P7000 has a mere 160gb but the Colorspace UDMA was configurable with up to 500gb of space AND the ability to install your own drive should you wish to upgrade in the future, all for a fraction of the price.
Operation
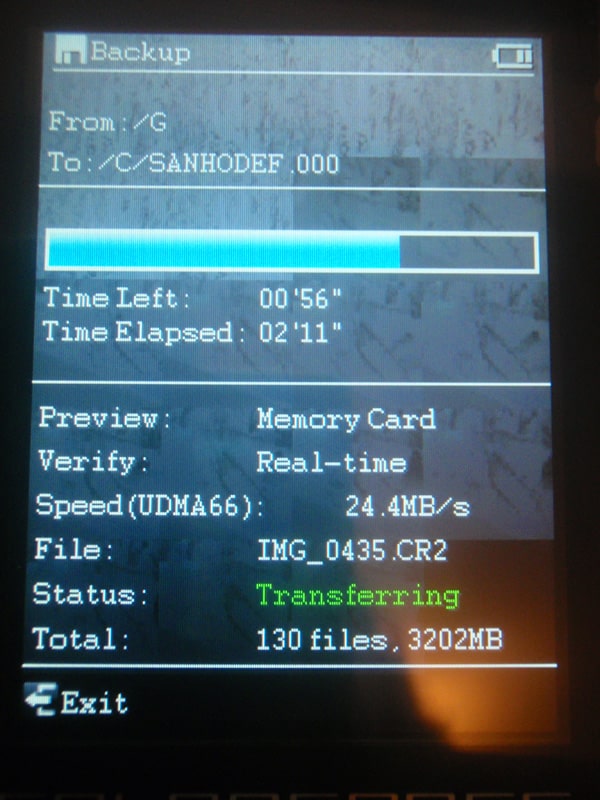
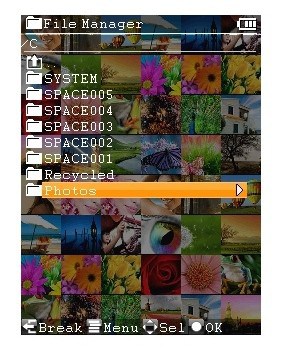
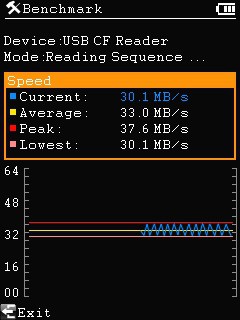
The instruction manual that comes with the Colorspace UDMA is a bit of a joke and contains such useless phrases as ” records CRC checksums of each copied file and compares checksums on the hard drive”. In fact, multiple menu options and features are inexplicably omitted entirely from the manual, so to understand it completely needs a bit of trial and error. Thankfully some of the operations, like card backup are fairly intuitive. When you insert a memory card into the Colorspace there are two ways to perform a backup. Firstly you can make a full backup which simply makes a drive image of the card into a folder on the disk. You can specify the name of the folder, and it copies the entire file tree from the memory card onto the colorspace. If you have files on the memory card, even ones the Colorspace can’t naively display (like video files) they will be copied in their entirety to the hard drive. While it performs this backup, an array of information is displayed on the screen including current file thumbnails and data transfer speed which was pleasingly fast. My Sandisk Extreme III 8gb cards were copied in just a touch over 3 minutes. If I had the newer UDMA Extreme cards, this time would be halved but even without, i’m more than happy with the speed. The second type of backup is Incremental Backup. This allows you to backup from the same card multiple times, each consecutive time you insert the card, only the new files that were not present last time will be backed up. This is useful if you are using some large sized cards. All images are also verified on import to check for any errors during the copying. If you happen to accidentally delete images from a card before you have imported them the Colorspace even has a photo recovery mode that will attempt to retrieve the deleted images.
Once the files are on the Colorspace you can browse the folders of photos just like you would on a computer. The interface is not the slickest I have every seen and its not the fastest or smoothest, but it does function pretty well. Using the file manager section you can perform all the usual file handling tasks such as copy , paste, rename, make new folders and delete. One thing I have a huge problem with though is the fact that there is no “delete ? Yes or No” screen. Once you hit delete, ITS GONE. You could be deleting a folder containing 100 other folders with 300GB of photos in it and all it takes is one accidental click and its gone. This just seems crazy to me. Not that its something that would dissuade a purchase but still, it seems odd.
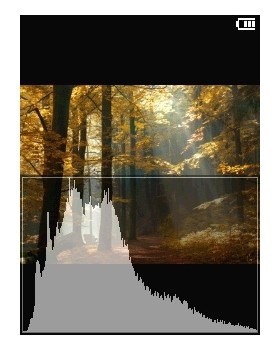 Heading into the image browser section will display all the photos in your selected folder with a thumbnail. You can zoom in or out to larger or small thumbs and click Enter when you want to have a closer look at one of them. At this point there will be a slight pause as the Colorspace generates the image frome the JPEG preview embedded in your RAW file ( if you are shooting RAW). I was impressed that it handled files from the relatively new Canon 7d with no problems. The image preview was also rendered in only 4 or 5 seconds which is not bad for an 18MP photo. Things are only marginally faster in Lightroom on my Mac though you probably wouldn’t want to use this for
  flicking through every photo from a 16GB memory card. Photos can be zoomed into and navigated just as they can be on your camera and clicking the down arrow brings up a large sized histogram overlayed on top of the photo. Clicking up will bring up the cameras EXIF data. You can also browse photos by date by using a large calendar which displays which photos were shot on which day. The screen is 3.2″ and does a reasonable job of displaying the image but my Canon 7d and 5dMKII screens look much better. It works great for displaying the user interface but If I was wanting to really look closely at my photos, the camera screen is better and seems to render the colors more faithfully. If you really do want to flip through all the shots at some point, there is an option hidden in the menu to let the Colorspace sit there and generate all the previews for all the photos in one process . This would take some time on larger cards and I would make sure that you have it plugged into mains power for this. If you do it though , you can quickly flick through all the shots on the screen, or have the Colorspace run a slide show automatically. Another nice touch is the ability to arrange the most used menu commands onto the front page as “shortcuts”.
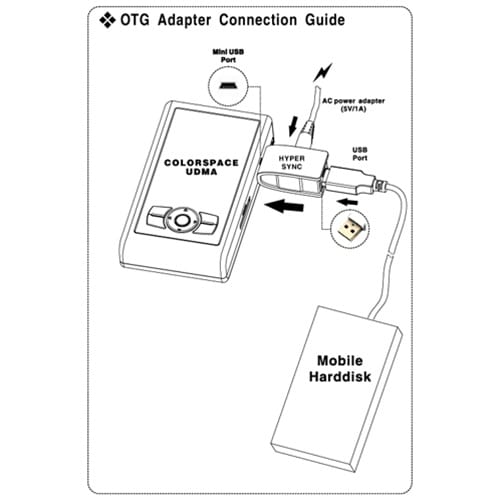 There’s no doubt that this is a fantastic product for someone wanting to ditch the bulk of a computer for a while. With its clunky buttons and aged looking interface It might not be that piece of technology that you flash around and show off to your friends but this is a photographers tool. It does exactly what it says it does and it does it fast and accurately with minimal fuss. If safely backing up your photos without a computer is your goal, then this is your solution. Being able to change the drive inside the colorspace means that this will be a useful addition to your kit for many years to come and the price is right too when you compare to the competition. But what if you are on an extended trip and you want to wipe your memory cards at some point. A single backup of photos on the Colorspace is not enough, you need to make a second copy. For me this is the ace up the sleeve for this unit. Using a separate available adapter, you can plug a USB hard drive into the Colorspace and sync the two together to ensure that you have a double backup of all your shots in 2 locations. You can also operate the file manager to create folders, rename files and move photos around on the external drive. The OTG adapter kit required to do this costs an additional $50. The one downside of
  this is that you will need some sort of mains power to make this work, the adapter is needed to turn the Colorspace’s USB port into a powered port in order to power the external hard drive. You should note that the external drive needs to be formatted as FAT32 in order to work. I tried using Mac OSX’s disk utility to do this and whilst it did format it as FAT32, the Colorspace failed to recognize the drive. It would see it plugged into the unit but fail to generate a file tree of any sort. You can however use the Colorspace itself to format the external drive, and once I did this it was recognized immediately and I was able to sync files with my LaCie Rugged drives, again at a pleasingly fast speed. When I followed up my formatting issue with one of the Hyperdrive technicians I was told that hyperdrive only supports 0x0C FAT32 partition using INT13 Extensions. I’m not entirely sure what this means but certainly if you are a Mac user it seems you will need to format the external drive using the Colorspace.
Pros
- Very fast transfer of images from card to hard drive
- Verification of images during import
- Ability to recover deleted photos
- Includes 12 Car charger & miniature screwdrivers for changing hard drives
- Ability to browse full Exif data from photos and view multiple histograms
- Sync files to an external USB hard drive is possible with OTG kit
- Much smaller and lighter than a Netbook or laptop
- IMO , reasonably priced
- Upgradeable with different sized hard drives and available without a drive so that you can install your own
Cons
- Inexplicably bad user manual and very limited information on the website. I had to google several queries to find other users experiences to answer some questions and finally contact customer support.
- OTG USB transfer seems to require you to format the USB drive using the Colorspace to FAT32 format. Drives formatted to FAT32 using MacOSX did not work for OTG transfer.
- The Delete option in the file manager has no confirmation screen. “yes or no” Delete and it is deleted!
- Initial boot up time is fairly slow and the on/off switch requires you to push it to the side and hold it there for several seconds. I can’t see the advantage of this over a regular recessed throw switch to make sure you did not switch off during backup.
- Screen brightness is adjustable in only 3 levels. Default is too bright but the next setting is too dark.
- You can end up adding several shortcuts to the shortcut menu that have the exact same name and no way to edit those names.
- Auto power off occurs even when the unit is plugged into power and no way to adjust the auto power off time.
- Buttons require a good solid push and can sometimes function slowly. A swift double click of the same button will often yield only one click on the interface.
- User interface is very basic and moves slowly
- changing the battery requires the use of the miniature screwdriver (which is provided).
Conclusion
So who is this device for? It does exactly what is says it will do and it does it without complaint and with accuracy. If you are unable to carry a computer with you on a shoot then you will be very grateful of the Coorspace UDMA. The ability to mirror the backup onto another USB hard drive means that you can go on a lengthy trip and always have multiple backups of your photos so long as you have access to power. This is probably not for the photographer though who simply likes to have a bag full of gadgets and toys. This is a professional tool that does the job without fuss or flourish. Technology enthusiasts and photo gadget fans will find the user interface and feel of operation to be slow and seem outdated in today’s iPhone world. Some of you might think that seems like an odd thing to say, well in that case you probably fall into the first category. If you already own one of the crop of new DSLRs from introduced in the last 12 months with 3″ screens then you aren’t going to have a better time viewing photos on this screen. But if your camera is a couple of years old with a 2″ screen then this screen will be a nice improvement and will let you check your photos with more accuracy. I think the price of the Colorspace is right on target, and if it’s a little bit too much for your wallet then Hyperdrive make a couple of cheaper alternatives that forgo the color screen to save some money, but maintain the main functionality I have been running cards through this thing for a week now and it has performed backups faultlessly so far. Both to the internal drive and also syncing to an external drive with the optional OTG kit. I will continue to test over a longer period but so far it has worked just fine for the job.
My Score : 7.5/10
The Colorspace UDMA is available HERE from B&H photo and represents some good savings over buying from Hyperdrive.com although if you want to buy the empty unit on its own and put in your own drive you will have to buy direct from Hyperdrive.
Alternatively they are also available from Amazon

