
This post was made possible by my friends at B&H Photo, where you can buy the Boulder 100 solar panel that I installed on my Taxa TigerMoth photography adventure trailer. Of course this content is also relevant to any other van or trailer you might be considering for your own adventure vehicle!
If you’ve been following the posts in the Overland section of my blog in recent months, you’ll have first seen me writing about how to connect a Goal Zero solar panel to a Zamp solar connection. This was my initial setup when I got this trailer, and it used a 50W Boulder 50 solar panel from Goal Zero. The port on the side of the trailer was designed for static use, which meant you could plug the solar panel in when the trailer was parked at your destination. It worked pretty well, but I soon discovered that for a photographer, power is going to be the hardest problem to solve when you’re trying to get off the grid for a few days. I needed more power…

I love the Goal Zero gear and I also love the support that the company provides – that’s very important in my book! The natural choice to bring a little more power to my setup was the Boulder 100 solar panel, which is the same as my Boulder 50, just twice the size.
Instead of having a static setup, this time I wanted to mount it onto the roof of the trailer so that it can be constantly adding power to batteries, laptops and camera gear that’s sitting in the trailer when it’s being towed along, or temporarily parked at destinations along the journey. It’s simply not that practical to keep pulling out my 50w panel and setting it up in car parks.
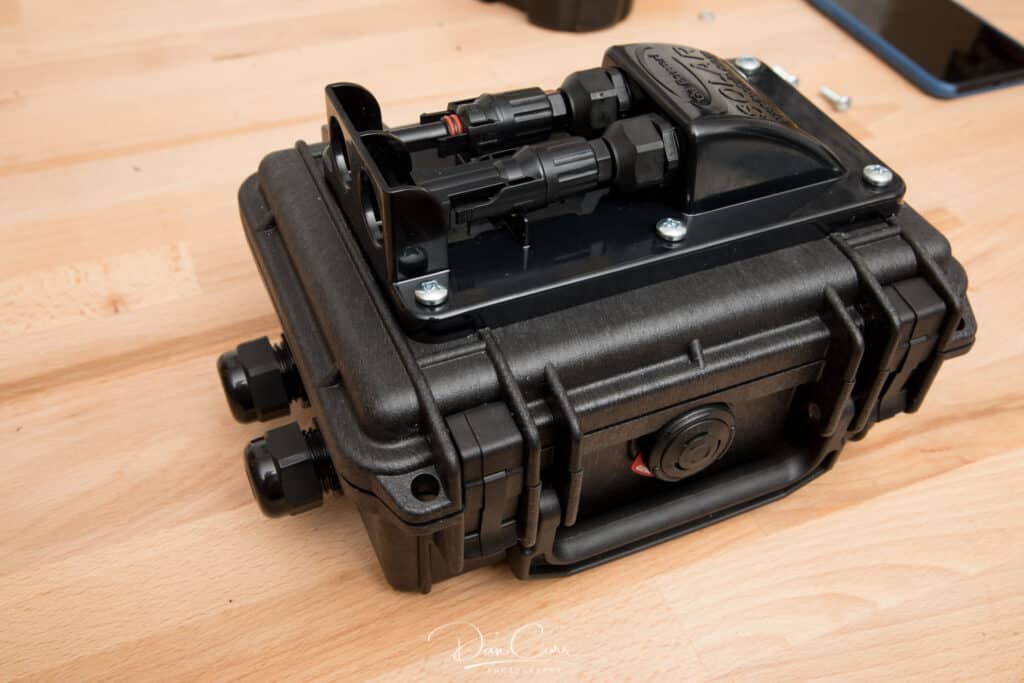
The first thing I did was build a solar junction box out of a Pelican case. This allows me to connect multiple Goal Zero solar panels to the trailer at the same time, and then pass that incoming solar power through the cable entry port and into the battery that’s inside. I detailed the build of this solar junction box here in a previous post.
The next thing that I did was remove the Zamp connection on the side of my trailer and replace it with a GoPower cable entry port that uses the much more robust , lockable and waterproof MC4 connection. The Zamp-style SAE connections are ok for static usage, but as it was configured on my trailer, the plugs would stick out from the side which isn’t great if you’re on the move. They’re also not that solid on bumpy ground as they just rely on friction to keep them held together. MC4 connections are the way to go if you want a permanent connection for a roof-mounted panel.

The installation of the MC4 port was simple enough, and I used black silicone to seal the edges of it, just as I did in the solar junction box build. I think it looks great!
In the previous setup, I would have a solar charge controller on the outside of the vehicle because the solar input was wired directly to the battery. At this point I also re-wired the interior of the trailer to route the new MC4 connectors to my solar charge controller first, before sending the power to the battery. For a permanent roof-mounted setup, you want the controller inside so that you don’t have to worry about weatherproofing it.

The next step wast to build a mount for the new Boulder 100 panel. Luckily my trailer already had full length Thule rails on the roof, so I only needed to find some horizontal bars to go on top. I actually picked up a couple of totally random steel bars for free from my local recycling depot. Thule ones might have looked a bit cooler, but I save a few hundred dollars this way and I think it looks just fine!

These were mounted to the Thule roof rails using Thule track nuts (park number 853-2106), which Thule kindly sent to me when I called them and asked very nicely! Good stuff Thule!!
Next I got a set of solar panel mounting brackets from a company called Renogy. At the time, Goal Zero weren’t selling their own brackets for the Boulder panels, but I have since noticed that they have started to do so, and B&H is selling them now. I wish I’d got these ones as I like the black colour, but maybe I’ll swap them at a later date. For now, the Renorgy ones are fine and they’re a bit cheaper too.

Mounting the panel onto the brackets is easy enough, but you go have to drill your own holes in the metal frame of the panel. Measure, measure and re-measure your drilling points before you do this! You’ll want to start with a small drill bit and work your way up to a larger one.
Once the panel was mounted, it was time to connect it to the newly installed MC4 port! You can buy pre-cut MC4 cables on Amazon pretty readily, but I decided to buy some 10-gauge wire and a set of MC-4 plugs from Renorgy so that I could make cables that were the right length for my purposes. If you go down this route, you’ll also need to buy this pair of cheap MC4 tools, and make sure you have a good pair of cable crimpers, like these ones that I got from Powerwerx.

It’s also worth noting that not all 10-gauge wire is built equally. The wire gauge relates to the thickness of the copper bundle that runs through the middle of the cable, but it doesn’t describe the thickness or rigidity of the plastic sheathing. You can get some some really flexible 10-gauge wire, or you can get stuff that has a much more rigid sheath which makes it hard to flex. I would recommend using the thicker, more rigid stuff in a roof-mounted panel setup. This will stop the wire flapping around in the wind while you’re driving your vehicle.

Once all that was done, I simply tidied things up with some cable ties and plugged it all in! I’m really pleased with this new feature of my trailer. It’s definitely going to make it possible to survive off the grid for longer periods of time, and now I can be collecting at least some power at any time during my travels. It also serves as an excellent way to keep the trailer batteries trickle charging and topped off when the trailer is parked up at home and not in use.
Stay tuned for more mods and upgrades to my photography adventure trailer coming soon!

