This part of the project was made possible by my friends at B&H Photo.
If you’ve been following along with the build-out of my photography adventure trailer then you’ll know that the last thing I did was to install a 100W Goal Zero solar panel on the roof, to go with my 50W panel that can be deployed alongside it. This has all been in preparation for adding a Goal Zero Yeti 1400 Lithium Power Station to the kit list.
When I first purchased the trailer in the summer I quickly realized that keeping my camera gear and laptop charged up was going to be tough. There’s a reason that I got such a rugged little trailer, I wasn’t going to be parking this thing in big camp grounds and using shore power very often. I wanted to be self-sufficient off the grid for a few days at a time.
Rigging up the first Goal Zero Boulder 50 panel a few months ago was a great learning step for me because it taught me a little about the efficiencies of solar charging systems, and about the kind of power I could reasonably expect to generate in a variety of weather conditions. Ultimately I realized I needed another solar panel, so the Boulder 100 was added to the roof.
I also realized that I needed a better way to store a large amount of power. To begin with I had a 12v marine battery that came with the trailer, and a small Goal Zero Yeti 150 that had been in my kit for a few years. The little Yeti 150, like Goal Zero’s other older battery packs, runs off a lead-acid battery. Lead-acid batteries are pretty old technology and they are extremely heavy for the amount of power that they can store. The future is lithium batteries, and Goal Zero launched a new range of lithium Yeti packs this year with the Yeti 400, Yeti 1000, Yeti 1400 and Yeti 3000. To give you an idea of the weight savings that this delivered, the old lead-acid Yeti 1250 weighed 103lbs, but the new more powerful Yeti 1400 Lithium only weighs 47.5lbs. Less than 50% of the previous version, and physically much smaller as well.

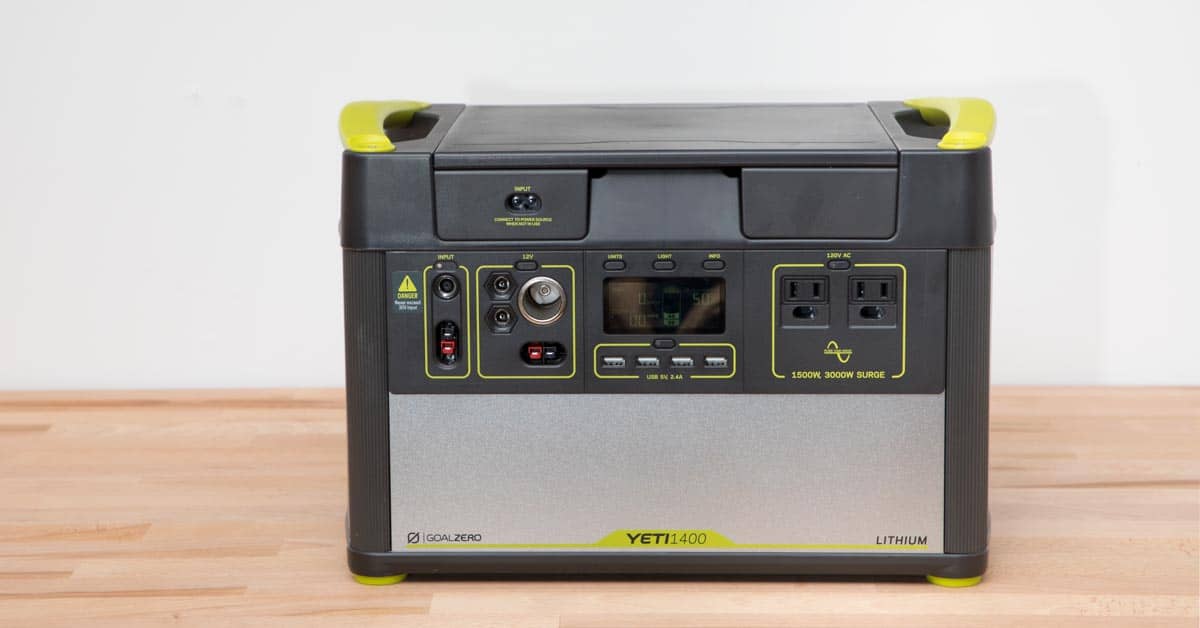
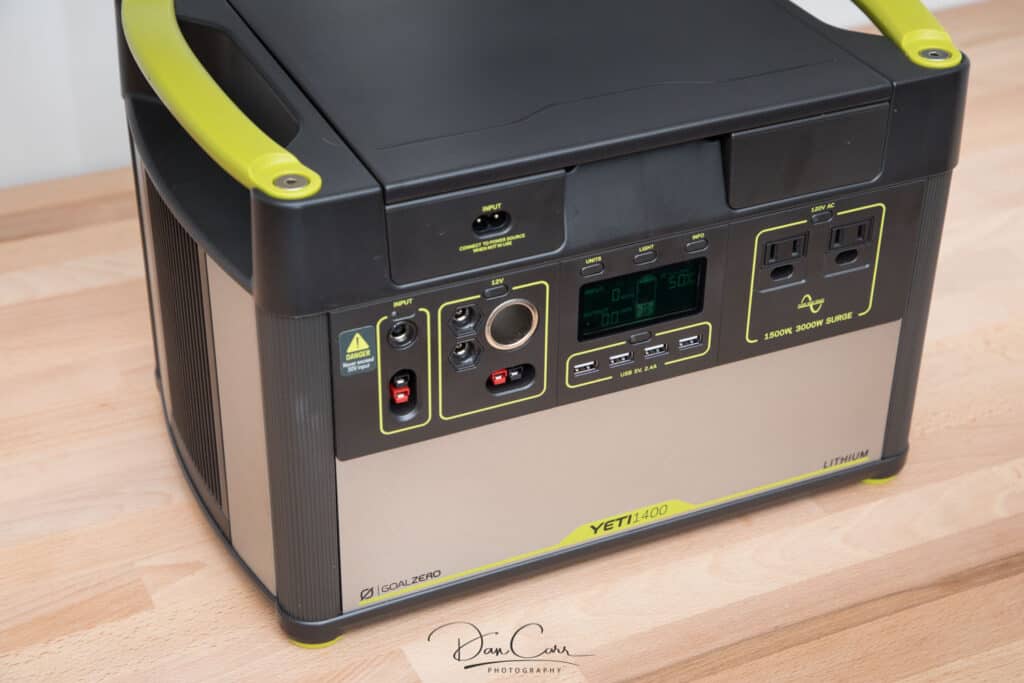
What I love about the Goal Zero Yeti battery packs is the simplicity of the whole system. The solar charge controller is built into the pack so all you have to do is feed power directly into it from your solar panels. For that input, the Yeti 1400 has a pair of Goal Zero’s 8mm power ports, as well as an Anderson power pole connector connector that can take up up to 30A (360w). Since Anderson connectors are available from any electrical hobby store, this means you can adapt any brand of solar panel to feed the Yeti.
For my setup I have both my Boulder 100 and my Boulder 50 panels feeding into a junction box that I built from a Pelican case. This then sends that power to a cable port on the side of my trailer which is fitted with waterproof MC4 connectors (see previous panel installation post for photos). Once the wires come into the trailer, I run them into the battery compartment using 10-gauge cable that I got from Powerwerx, onto which I have crimped a set of Anderson power pole connectors for feeding into the Yeti 1400.

If you examine the photos of the front of the Yeti 1400 you can see the input ports on the far left. Those with keen eyes, and some prior knowledge of power pole connectors will see that the inputs here have a non-standard vertical configuration. The reason for this is that there’s a second power pole connection just to the right of the inputs, which is actually a 12v output. Goal Zero decided to use a vertical orientation on the input connector so that you could not accidentally plug the input into the output, which would cause instant damage to panel and battery pack. This makes sense, but if you’re planning your own “van life” wiring setup with this thing, you need to take this into account because it means you’ll most likely have to buy the power pole connectors yourself and create the pair in the vertical orientation. Pre-built power pole cables are not readily available in this non-standard configuration, unless it’s a specific Goal Zero branded adapter, like these ones.

So the Yeti 1400 has three power inputs, but what about outputs?
The front of the unit has two of Goal Zero’s proprietary 6mm outputs, and there’s a third 6mm output hidden in the hatch up top. These 6mm outputs are 12v, and primarily useful for powering their Light-a-Life 350 LED lights. It’s unlikely that you would need all three 6mm outputs though, since the LED lights can be chained together in strings of 8 anyway. Any spare 6mm outputs could be adapted to a variety of other connections using Goal Zero cables if necessary. As well as those 6mm outputs, there’s also a standard cigarette lighter style 12v output, a 12v power pole output, four USB ports and two 3-pin 120v AC sockets. These AC sockets use a pure sine wave inverter which is great for sensitive equipment like my laptop, and can handle a peak load of 3000w! You could run some serious power tools with this thing if you wanted to!
Input and Output Monitoring
The front of the Yeti 1400 has an LCD screen to give you vital data about the battery pack:
- Charge level indicator (0-100%)
- Current battery voltage
- Current power draw in watts and amps
- Power input in watts
- A watt hour counter that will tally up the total power that has been output since you last reset it
- A “time until empty” indicator
All of this information turns out to be extremely useful because you start to learn how much power is consumed by specific pieces of equipment, and in-turn, this helps you to better manage your consumption, and hopefully somewhat balance it with the solar input. The one issue I have with this part of the Yeti is the disappointing sensitivity of the power input reading. It appears as though the input wattage meter doesn’t register anything at all until you get to somewhere around the 20 watt range. If your solar input is low, on a cloudy day, you might still bring in 15 watts of power but the Yeti’s input indicator will still read zero, and the blue charge light won’t come on. After some time you’ll notice your battery charge percentage does increase, but I did find it frustrating to be left in the dark, not knowing if it was purely a low input power, or whether there was some fault in my wiring. I love almost everything about the Yeti 1400, but that’s definitely the one thing that keeps bugging me.
What Can You Power?
The Yeti 1400 should charge a cell phone over 70 times, a laptop over 20 times and run a Light-a-Life LED for 460+ hours! Of course all of this is assuming that you don’t add any power back into it using solar panels. If you are able to input solar power while you’re also consuming power, on a sunny day it’s surprisingly easy to break even on your consumption with a setup like mine with 150w of panel real estate. My 12v refrigerator averages a power draw of roughly 20w, so a reasonably sunny day with 150w of panels will easily keep up, even allowing for the inefficiencies of solar charging.
As you can see from the photos the Yeti 1400 takes up very little space in my trailer, but if offers a plethora of input and output options that make life so easy! I also love that it is portable because it means that when I set up camp, I can take the battery outside with me to set up a charging and laptop photo editing station on a camp or picnic table, without the need to run a ton of extension cables. On top of that, if I’m going on a shorter trip for a day or two without my trailer, I can put the Yeti in the trunk of my car! Seriously, this thing is brilliant! It’s not inexpensive, and casual campers will probably be more than happy with the smaller Yeti 400 Lithium, but for a photographer like me, the Yeti 1400 is the perfect balance of capacity and size.

