EQUIPMENT USED FOR THIS SHOT
- Canon 5D Mark IV
- Canon 24-70 f/2.8 L II
- Really Right Stuff TQC-14 Tripod (my lightweight hiking tripod)
- My MindShift Gear Ultimate Adventure Combo (Read all about it HERE)
- Formatt Hitech Firecrest circular polarizer (use coupon code “DanCarr10” to save 10% from Formatt-Hitech.com and Formatt-HitechUSA.com)
- Really Right Stuff Pano Elements Package
- I use a Peak Design Clutch strap and Leash strap on all my cameras.
Watersprite Lake Pano – Squamish
This epic little alpine lake is accessed off forestry road out of Squamish, BC. I’m not going to go into details of exactly how to reach it because there are far better sites out there for that, with GPS maps and all that good stuff. The hike on what is known as the “old” trail is about 7km each way, and there’s an option to take a newer trail which is closer to 9km each way. Sections of the trails involve scrambling over boulder fields and pulling yourself up some steep, muddy inclines. In short, it’s the kind of hike where you need to give a little consideration to the amount of gear you’ll take with you if you want to have a comfortable day of hiking.
I chose to go with my new (at the time) 5D Mark IV and my 24-70 f/2.8 L II. A full frame body with a lens covering that kind of focal length is a greta option when you just aren’t all that sure what you’re going to be shooting. I also packed my travel tripod and a couple of items to help me make a panoramic photo. Prior research lead me to believe that a panorama of this lake would be great, which is why I went to the effort of taking that stuff with me.
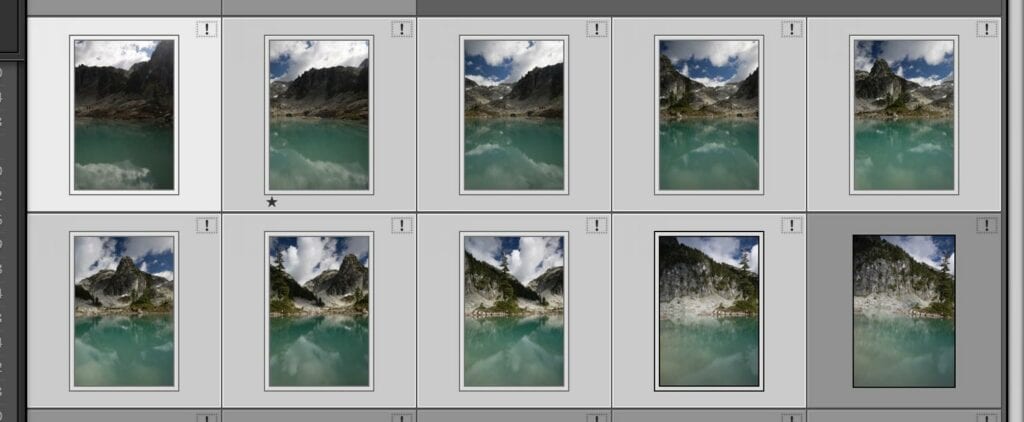
I shot the single images for the panorama in a vertical orientation which is the preferred choice to maximize the final resolution of the image. It needed 9 images in total for the pano, so with the 30MP sensor in the 5D Mark IV, I was working with 270MP of data when putting it all together. If you shoot in horizontal orientation it probably would have only take 4 images to cover this field of view, so the total number of pixels would be considerably less.
When it comes to stitching a pano together, I try it first in Lightroom CC because this generates a panoramic RAW (dng) file that I can continue to work on after the stitching process has been completed. If you are diligent about your pano shooting process, especially using a pano head on your tripod, Lightroom will do a great job of the stitch. In certain very complicated situations, usually ones with a lot of close foreground detail that’s susceptible to parallax issues, I have to use the pano software called PTGui. This is powerful software, but it’s much more time consuming so I try not to get myself in that situation. In this case, Lightroom did a flawless stitching and blending job.
Ripple Removal
In order to smooth out the water in the lake, I chose to use the longest possible exposure for my setup at the time. This meant using an aperture of f/22, and when combined with the circular polarizing filter it resulted in 4 second exposures. Now, usually I would not want to use a lens at its smallest possible aperture because it’s not at its sharpest when you do that. In this case, I decided the trade-off of getting a smoother lake was worth the loss in sharpness. It’s still by no means a soft image, because the Canon 24-70 f/2.8 L II is one of the sharpest zoom lenses on the planet, and even outperforms most primes in the same focal range. It would have been nice to have a set of ND filters with me to allow for a longer exposure but at a wider, sharper aperture. Unfortunately, when you are picking gear for such long backcountry hikes, there are always going to be things left behind in the gear closet. It’s simply not practical to carry the kitchen sink with you sometimes when you also have to carry food, water, clothing and other supplies for what amounts to about 20km of hiking and scrambling by the end of the day.
Using a Circular Polarizer with a Panoramic Photo
In most places on the internet you’re going to see that people will tell you not to use a circular polarizer with a wide-angle lens, or during panoramic photography. This is just one of those “rules” that people love to trot out, but actually it’s total bull. You CAN use a polarizer with a pano, I think you’ll agree that my photo proves this, but you do have to really understand how a polarizer works, and you have to use it very carefully. There are some situations where it won’t work, but it’s certainly not a blanked rule that can be as blindly applied as many people would have you think.
When you use a circular polarizing filter in a landscape image, it’s going to have two main effects on your photo. It’s going to darken the blues in the sky, and it’s going to remove the glare from the surface of any water in the shot. The tough thing to deal with is that the level to which these two changes occurs, will vary depending on the angle of your camera to the sun. This means that if you have a totally blue sky and shoot a wide panorama, the sky will end up being different shades of blue across the sky. This is most commonly referred to as the reason for not using a polarizer in a pano. Take a look at my photo though…not much sky in there! The saviour in this case was the dramatic cloud cover. Had there been no clouds, I definitely couldn’t have used a polarizer easily at all, but in this case, you only see little hints of blue through the clouds and because it’s not continuous, you won’t notice any variation in the colour.
The other thing to realize when trying to use this technique is that you don’t always have to use a polarizer at its maximum effectiveness. Sometimes it’s better to back it off a little bit in order for the variations to be less noticeable. In short, you CAN use a polarizer with a pano photo sometimes, but you have to have a good understanding of the effects so that you can pick and choose those times, or adjust your composition to favour the situation. For example, there was a lot more blue sky overhead, but had I shot wider, and included more sky, I would have run into these variation issues in a much bigger way. Using my technical knowledge, I therefore composed an image that played to the strengths I needed.
Image Edits
As usual, I like to keep my editing pretty quick and painless. I do the majority of adjustments in Lightroom, but this time I also had to jump into Photoshop to remove three people from the image on the right-hand side. They were easily cloned out of the shot using the content-aware healing brush and a little cloning. No more than two minutes work there.
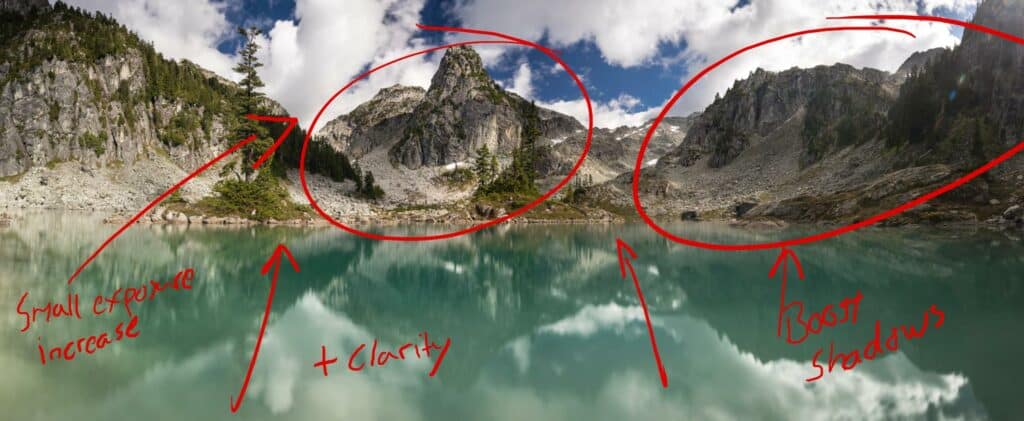
In Lightroom, I need to balance out the brightness of the image somewhat. The right side of the image was in the shadows and the rocks were just too dark, causing my eye to gravitate towards them and not the peak which is where I really wanted people to look. I used the local adjustment tools in Lightroom to boost the shadows in this area, and the increased dynamic range of the new 5D Mark IV was very welcome here! It did a stellar job of maintaining shadow detail and I think that’s the first time I’ve ever said that about a Canon camera.
I also dragged a graduated adjustment layer over the water to boost the clarity, and this has the effect of making the reflection stand out a little bit more. After a quick tweak to the global black and white levels, and a little global saturation increase, it was done! Nice and simple – Mother Nature really did a lot of the work on this one, I just had to get there.


