
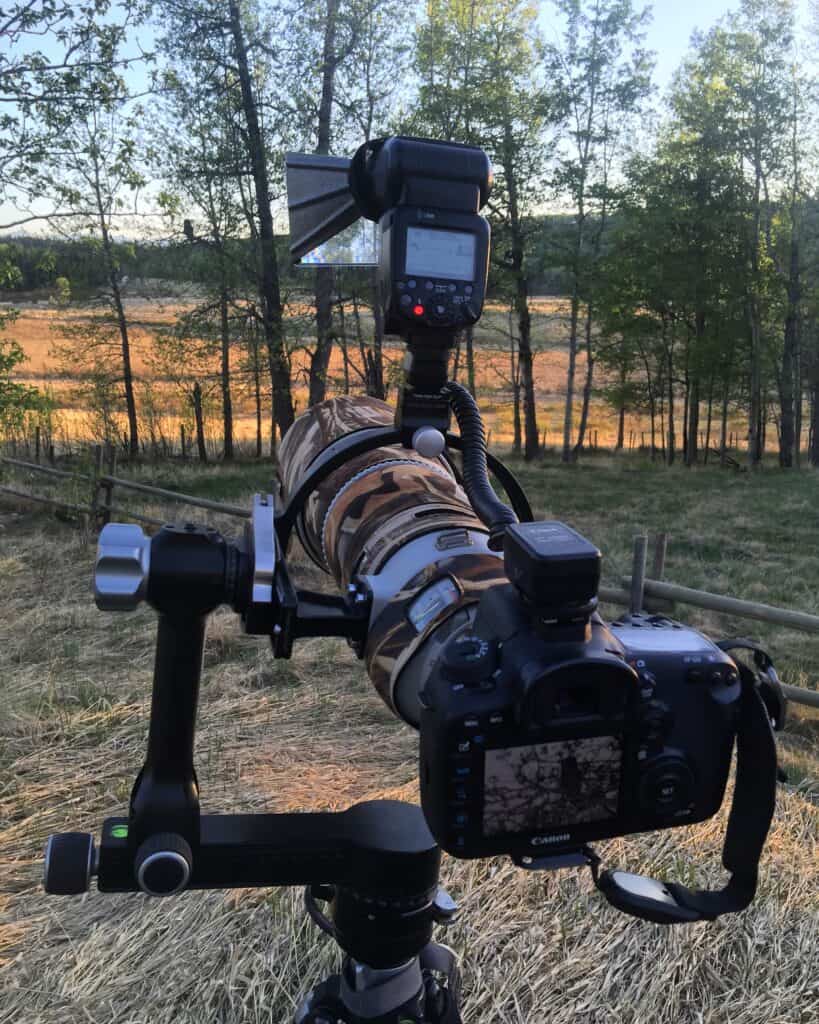
Equipment Used For This Shot
- Canon 7D Mark II
- Canon 200-400 f/4 L IS 1.4x
- RRS PG-02 Gimbal
Let’s Get Technical
I’m going to take a slightly different tack with this particular post in the Behind the Shot series. Rather than talking too much about this specific image, I want to talk about a technique that allowed me to get it.
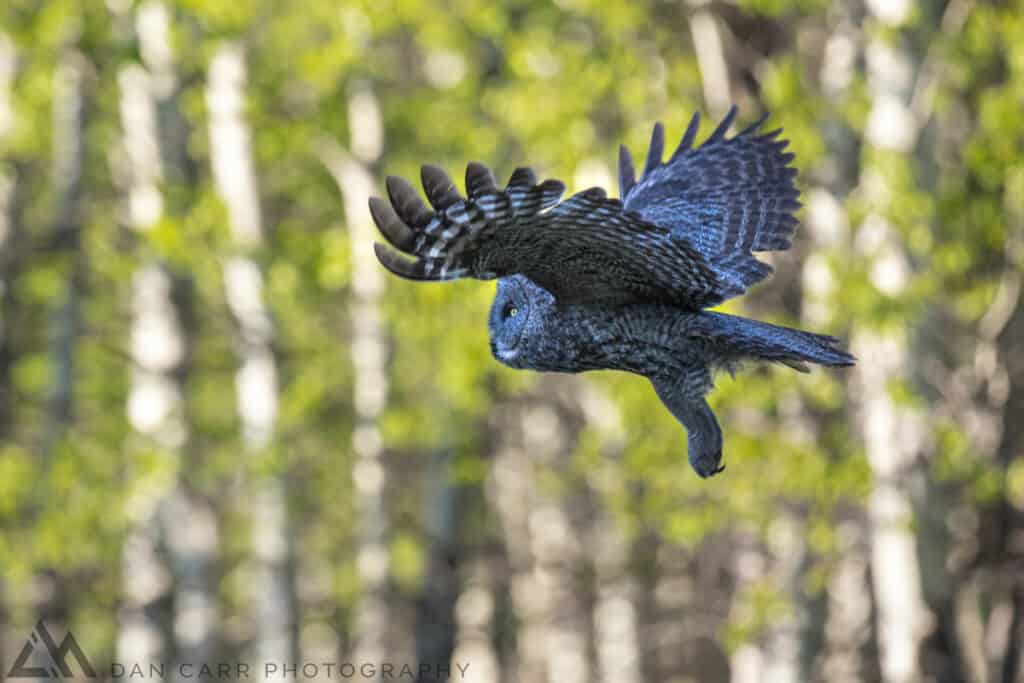
Most of the time when you find a bird like this, it’s not just going to suddenly appear in your field of vision and swoop right past you out of the blue. The vast majority of times, you’re going to find it perched somewhere and then at some unknown moment it’s going to take flight and hopefully come in your direction.
The problem you’re faced with is that best camera settings for shooting a static bird, and those best for shooting one in flight, are very different. So how do you deal with this disparity? When the bird is static you can use a much slower shutter speed, and the reason you’d want to do that is because it will allow a lower ISO which in turn will give a cleaner image. In bright light, this might not be a problem, but birds of prey tend to hunt in the darker hours.
So, do you sit contentedly getting your perfect slow shutter static shots and then say “ho-hum” when it suddenly flies off and you get a bunch of blurry flying shots?
HECK NO!
Here’s Three Ways to Deal with This Problem
1. Get some in the bank, then wait.
This is probably how most people deal with it. Get a few good static shots in the bank, then adjust your shutter speed and other settings in preparation for the take off and flight photos – then sit and wait. This is a good easy way out of the issue, but there’s a number of problems with it. Firstly, the bird could very well fly off while you are getting your “bankers” with your static settings. Secondly, the bird could do something that looks great once you have already switched your settings in preparation for flight. Yes you’d get the shot, but if you shot it it ISO3200 and it’s the best shot you get that year, you’ll probably wish you’d got the same shot at ISO800.
2. Fast fingers method #1
I’m speaking as a Canon user, but Nikon has very similar options under different names, I’m sure you’ll figure it out. With Fast Fingers #1 as it shall henceforth be named, you’re going to predict the point of takeoff and then adjust some settings very quickly – it takes some practice but it goes like this:
- Set your camera to Auto ISO mode and TV (shutter speed priority).
- Set your AF settings so that the AF-button on the back of the camera uses one-shot AF mode with a single AF point – which is best for static subjects.
- Set your DoF preview button on the front of the camera so that when held, it activates full AI Servo mode with ALL AF points. This is hidden within the custom functions of the camera. If you use a 1D X, you can also use the custom button on the front next to the DoF button.
- Shoot your static images of the bird on its perch with a relatively low shutter speed, allowing the camera to automatically choose a low ISO, and silently high-five yourself for getting the bird’s eye in focus (important!)
- When you see the bird is about to take off (usually the wings will twitch a bit), hold the DoF preview button to activate AI Servo mode on all AF points, then quickly roll your finger across the shutter speed dial under your finger. You should be able to accomplish these two actions in a split second with practice. Now your camera’s shutter speed will be increased dramatically, the camera will adjust the ISO automatically if you bump up against the max aperture of your lens, and you’ll have the benefit of full AI Servo and all AF points to nail your erratically flying target.
This method is probably the fastest way to change from “static mode” to “flight mode”, but it has some downsides. It takes a bit of practice to roll the shutter wheel to the exact right point in a split second. You have to be somewhat aware of how many clicks you want it to make to get from A to B. For example, to go from 1/125 to 1/1000 would be 9 clicks, as each click represents 1/3 of a stop. (Here’s a shutter speed chart if you are rusty). The second potential problem with this is that you’ll almost always end up shooting with your lens wide open when you use this method. As you advance your shutter speed, the camera will at first compensate by opening up the aperture, and once it’s open all the way, it’ll use the Auto ISO to increase the ISO if necessary. This can, if you are very close to the bird, give you a depth of field that’s narrower than you might wish. Not always, but sometimes.
Note: On some of Canon’s more recent cameras like the 7D Mark II and the 1D X Mark II, you can actually assign the AI Servo settings to the AE lock button on the back of the camera, right next to the AF On button. This is slightly easier to use since you just have to slide your finger over a quarter of an inch to make the split-second switch between AF modes. There’s a ton of options, get to know them!
3. Fast Fingers method #2
For Fast Fingers #2, we’re going to use the often underused Custom Shooting Modes, the C1, C2, C3 options on the main dial of Canon cameras (Nikon equivalents exist as well). For whatever reason, people really don’t use these too often, but this scenario is a perfect example of when it might be useful. With Custom Shooting Modes, you can assign full sets of camera settings to a specific mode, and then switch from one to the other in a split second. To set Custom Shooting Modes on a Canon camera, simply choose all your settings (exposure and AF modes), then go to the Tools tab in the menu and select Custom Shooting Mode>> Register Settings>> C1, C2, C3. For a full list of exactly which settings get saved in Custom Shooting Modes, refer to this Canon document online.
In this scenario we would:
- Set up our camera for the perfect static shot. Single, central AF point, one-shot AF mode, lower ISO, slower shutter speed.
- Use the instructions above to assign these setting to C1.
- Then set the camera up for the perfect flight shot. Faster shutter, higher ISO, AI-Servo and your preferred AF point cluster depending on the framing you are aiming for.
- Assign this setup to C2.
- Switch to C1 mode and get snapping with your static shot, all the while keeping an eye out for the tell-tale signs that the bird is going to fly off.
- Keep your hand on the control dial, ready to rotate it to the C2 position (this is awkward if you aren’t using a tripod and gimbal)
- IT’S GOING!! Quick, rotate to C2 on the dial and get snapping and following that bird with your new exposure and AF settings.
- Chimp your photos. High-five.
This works pretty well, but like I said, it’s hard to keep a solid hold on the camera and the control dial unless the camera is on a tripod, and then that would require a gimbal so that you can quickly follow the bird’s flight since there would be no time to faff with a ball head. Many long lens shooters have this setup anyway, so it might not be a problem.
The other benefit for this method is that you can very quickly switch back to C1 mode again if the bird doesn’t actually take off. Maybe it was just fluffing its feathers a bit and trying to fake you out 🙂
Personally I like the ergonomics of Fast Fingers #1 a little bit more, but having these two scenarios programmed into your C1 and C2 positions should be a requirement for all wildlife photographers. They come in handy all the time, and you can even used C3 for an even faster shutter speed scenario. The complexity of Canon’s latest AF systems means that as we switch settings in both the Fast Finger techniques I have described, you can even add specific changes in AF custom functions as well so that your C2 mode could have AF settings that are tuned for the more erratic motion of a bird in flight. And before you ask… it’s all in the manual 😉

