Since I took delivery of my Canon 5dMKII last year I have had a lot of fun learning about shooting video and investigating the potential that the Canon DSLRs have in shooting HD movies. With so many people embracing the movie making capabilities of these new cameras, I wanted to check out some products that can potentially make your videos stand out from the crowd. A commenter on a previous post about video accessories for the 5dMKII, suggested that I try out some of the products from the US company Glidecam. At the time I had a few other things to check out but recently I saw some incredible war footage shot by journalist, Danfung Dennis. He used a glidecam HD-2000 to shoot the stunning footage for his documentary, Battle For Hearts And Minds. After seeing this I had to try it out and the kind folks at Glidecam were gracious enough to lend me one to try out for a few days. Read on to find out more…..
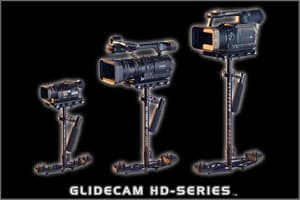
I had an HD-2000 to test out but Glidecam also makes an HD-1000 and an HD-4000 for slightly smaller or larger cameras than mine. The first thing that struck me when I grabbed the individual parts from the box was how light they were. Obviously the counter-weights were…… weighty, but the rest of the Glidecam was beautifully machined and they have obviously made efforts to keep the weight down to a minimum without compromising the construction. Which is nice because you have to hold it all with one hand! With some simple assembly complete I excitedly attached my 5dMKII to the mounting plate on the top. Removing the top plate to mount the camera means unscrewing 4 different screws and dealing with several tiny washers. If you plan on taking the camera on and off the Glidecam a lot I would recommend investing in either the Manfrotto 577 rapid connector or the Manfrotto 357 quick release plate. Both of these will add the ability to keep a Manfrotto plate attached to the camera for quick and speedy mounting.
Once you have the the pieces assembled and the camera mounted, you need to balance the Glidecam. Initially I completely underestimated the importance of VERY accurate balancing, I guessed at the number of weights needed and pretty much just threw it all together as I was excited to try it out! I quickly realized though that this method doesn’t work. There is an excellent video on the Glidecam website entitled Stability Of Balance that makes things much clearer (link at the bottom of the review). Once I watched that video it was much clearer to me how important it is to take the time to get things right. Using the supplied weights, you first need to obtain the correct vertical balance. With a Canon 7d mounted , I only needed to add 2 of the weights to the bottom to obtain the correct vertical balance. Small adjustments can be made with the 6 inch telescoping section. Something to bear in mind is that the higher you place the weight on top of the Glidecam, the more weight you will need to add to the bottom to balance the system ( think back to high school when you were learning about moments and levers). If you have some sort of accessories to add to the camera, like a microphone or sound recorder, you would do better to mount it at the same level as the camera. By doing this you will need to add less weight to the bottom and make it much easier to carry the whole thing! You could even replace the counter-balance weights on the bottom with those accessories though that would require a bit of ingenious mounting. Adding extras to the top mounting plate would be a breeze though as the plate is covered in holes to allow you to easily position things all over it (see photos in the gallery below).
Once you have vertical balance achieved, its time to move on to horizontal balance. Using the front mounted and side mounted screw knobs on the top plate allows you make minute adjustments to get the camera sitting straight. This can be a slightly frustrating process as even the tiniest rotation of the screw can set things off balance Speaking from experience, make sure you tighten the screw that holds the camera to the top plate to prevent it from rotating and throwing the balance off again……
The vertical balance is easy to maintain so long as you keep the extending section of the tube tightened. Horizontal balance on the other hand, is something that needs constant re-adjustment as you make changes to the camera. It is balanced so finely, that even adjusting the focus of my wide zoom lens would throw off the balance as the lens elements moved around inside the lens. The same goes for using a zoom lens , even one that does not extend when zooming, required adjustments to be made with every focal length selected. This experience is obviously specific to using a DSLR on the Glidecam. I’m sure that using a camera such as the Panasonic HVX , with a fixed lens and much smaller lens elements, would require a lot fewer re-adjustments after the initial setup. Using something like a 5d or 7d you definitely have to plan out your shots and make sure you know what lens you want to use and where you want to focus. It’s not a case of just taking the Glidecam out of your case and grabbing a quick shot here and there, it needs some forethought.
So why go to all the trouble then? Well the answer to that question lies in the results you will get ! Remember what I was saying about producing shots that stand out from the crowd (an ever growing crowd these days with the DSLR video revolution)? Creative use of Glidecam shots within a video project will add something extra. No it’s not the same as using a full body mounted steadicam rig (which they also make) but at a fraction of the cost, with careful setup and good technique , you can get very close. I was hoping to have some time to put together a short video myself but unfortunately I have been called away on a trip and Glidecam need their unit back There are however some excellent video examples out there on the internet. Danfung’s work that I referenced earlier is a MUST watch, and the fact that he was using the HD-2000 in a wartime situation is also a testament to the build quality of the product. Some other great videos that demonstrate it’s abilities HERE , HERE and HERE (this last one has some great shots where you can see the guy is running with it following the BMX).
Pros
- Surprisingly lightweight components (before adding the counterweights)
- Very well made and machined
- Very compact when broken down into it’s 3 components, will easily fit in most bags/backpacks or cases
- Balance point adjustment screws on the top plate are a great idea and allow very fine control.
- Plethora of top plate mounting holes allows for other components to be added such as audio components.
- Very very smooth bearings in the gimbal
- 3 way movement of gimbal allows for some great panning shots
- Rubber feet on the bottom, a small but nice touch so you can rest it on a flat surface to get a shot
Cons
- Setup time is quite long to get perfect balance. If you have a camera with an integrated lens this is no problem but if you have interchangeable lenses, it requires time consuming re-configuration with each lens change.
- Removing the camera from the top plate is not a quick operation. Benefits from adding a third-party quick release plate.
- No reference markings on the extending column for easy repetition of previous settings.
- Also no reference markings on the top plate or next to the adjustment screws for noting balance points for a particular camera/lens configuration.
- Using a zoom lens on a DSLR needs balance point re-adjustment after every focal length adjustment due to the movement of the glass elements.
Conclusion
I know that a lot of ski and snowboard shooters read this blog and I think for followcam footage in this area it would be a fantastic product. When I started to practice with it (and it does need practice) I was just running around my yard and smiling at the shots I was getting. The beauty of the free floating, three axis Gimbal though is that you can do much more than just walking or running around with it. Pseudo boom shots popping up from low angles are easily possible and very effective and with a light touch of the finger just below the gimbal you can perform wonderfully smooth horizontal or vertical pans too. To say it is a step up from hand holding the camera would be a huge understatement, it totally transforms the look of the shots BUT it needs practice and it requires some very careful setup. For a ” run and gun” situation it would not be so effective if you are using a camera with interchangeable lenses but if you have the time to get it right you will produce some great looking shots. In the short time I had to use it I noticed a definite improvement in the stability of my shots from my first attempts with the Glidecam as you begin to learn how your body movements translate to the camera movement. You will start to second guess the inertia that you are giving the camera through your movement and compensate for it, or incorporate it into your shot. I’m a big fan of having fun while you are shooting too and this had me smiling the whole time, well…. apart from while I was trying to balance the camera to begin with.
RRP for the HD-2000 is $499 but they are available from B&H for less or from Amazon via the links below.


