• Adobe have released Lightroom 3 BETA as a free download on their website.  Users can download it and try it out for free until the release candidate hits the shelves in the first half of 2010.  There are some nice updates but the whole thing is very buggy right now.  I would recommend trying it but not using it to replace LR2 just yet.
  • Yesterday I received my new Canon S90 from B&H photo.  This little camera has the same sensor as the new Canon G11 and offers full manual control and RAW shooting.  I wanted a high quality P&S camera and found it hard to choose between the s90 and the G11 but i’m glad I went with this.  It is incredibly small.  I would have no problem having this in a pocket all day, you’d never know, which is something that can’t be said for the G11.
  • I’m heading to Mexico for a week and i’ll be taking some time to test the S90 while i’m away, expect more info when i get back.
  • I’m also taking my Canon 7d with me.  I’m just going to take the one lens as photography is not the reason for my trip but I wanted a simple case to put it in so that i could safely pack it into my F-Stop Satori along with some clothes.  I picked up a Neoprene case from LensCoat called the bodybag and i’m impressed with the quality.  The stitching seems to be very sturdy and if you need a simple case to protect a body and a lens from scratches then this is a great option.  They make a variety of cases for lenses and bodies in different combinations and I was so impressed by this one that I ordered a couple of cases to hold camera bodies on their own for a little added protection when inside your regular camera bag.

This evening Canon has announced the latest incarnation of the 1 series camera, the 1DmkIV

A quick run down of the key specs:

  • 16 megapixels
  • APS-H (27.9 x 18.6mm) size with a magnification factor or 1.3x
  • New 45 point auto focus system
  • 39 cross-type focusing points
  • High ISO setting up to 102,400
  • 300,000-cycle shutter mechanism
  • 63-zone meter
  • 1/300 standard flash sync
  • Twin CompactFlash and SD card slots
  • $4,999 body only (US price)
  • Available late December
  • 1080p video in frame rates of approximately 30fps, 25fps, and 24fps.
  • 720p HD video at 60fps
  • 10fps continuous shooting speed.
  • Dual digic IV chips

Continue reading »

Almost more than any other question I get asked is ” What camera bag do you use?”  This is the answer…… well, one of them anyway.  F-Stop is a company which specializes in camera bags for the adventure minded photographer.  If you like to ski, hike, climb or ride a bike with your gear these are the bags for you.  My main use for the Satori is backcountry skiing and my previous one saw some heavy action over an 18 month period.  During this time, F-Stop was constantly seeking feedback from a group of action sports photographers including myself and others like pro climbing photog Tim Kemple.  The result of our findings and feedback is this newly updated pack released this month.    F-Stop bags are available in limited stores but also available directly from their web store HERE.  Hopefully the photos at the bottom give you an idea of just how much stuff you can fit in this bag. There is plenty of room in the pack for all my camera gear as well as things like shovel and avalanche probe ( see photos below).  This new version is available in Red, Black or Green.  If you are looking for something similar but a little bit smaller then check out the F-Stop Tilopa.  It is almost identical in design, only slightly smaller.

Most photographers go through a perpetual search for the perfect camera bag.  Well I can finally stop that search, for backcountry ski photography this is THE bag and it will also suit photographers of many other outdoor sports.  The seam-sealed zippers keep your kit safe and dry and the material is incredibly durable.  The last version I had showed hardly a scuff after 18 months of use!

The HUGE internal camera compartment allows me enormous flexibility in choosing what equipment I carry with me and with the excellent harness system I can easily carry 30-40lbs all day long with no problems.

By removing the XL camera block and replacing it with a smaller one I can also use this bag for an overnight camping trip or a weekend trip away to the city where I only need a 1 camera, 1 lens setup with room for clothing and a laptop.

When I decided I needed to get this video stuff dialed, I needed something to shoot.  There’s no point trying to figure this all out unless you have a purpose and some footage to play with.  Leigh Powis, a local skier from Whistler, told about his crazy plan to put a trampoline on top of a cliff to help him practice a few new tricks before the winter.  This was the perfect chance to try filming some action AND some lifestyle.

So below is my very first ever video with the 5dMKII.  We shot it on 3 different days for about 2 hours on each day.  Please click through to the actual Vimeo page if you want to watch the video in HD.  But come back to find out more about the video!!

Cliff Trampoline – Whistler from Dan Carr on Vimeo.

The lenses I used to shoot it were the 85mm1.8 , 17-40 f4, 24-105 f4, 70-200 f4,45mm 2.8 Tilt Shift, 15mm fisheye and the 50mm 1.8.

There are many people out there shooting videos with the 5dMKII right now.  The new intro for Saturday Night Live was even shot with one last week!  A lot of these video pros are attaching all sorts of accessories to the camera to make it easier to shoot video.  External monitors, follow focus systems, matte boxes, shotgun mics and all manner of crazy rigs to hold them all together.  This video though was shot with a 5dMKII on a tripod.  Nothing else.

The tripod had a manfrotto 701HDV video head on it but that’s about the only difference to what I would usually carry for shooting photos.  That’s not to say that all those potential accessories don’t make a difference, they undoubtedly do, but they are not a necessity if you want to travel light.

The whole video was shot in full manual mode so that I had total control over the aperture.  In order to shoot at very wide apertures and keep the shutter speed down to something normal, I used a 2-stop neutral density filter on some of the lenses.  Occasionally I also put a polarizing filter stacked on to the ND filter which has the effect of cutting down the light even more.  This did produce some vignetting which you can see in a couple of the shots, but it actually looks like a nice effect!  A 2 Stop ND is going to be the absolute minimum you need to get a nice looking DOF on a bright day though.

For a couple of shots I attached the camera to the end of a Manfrotto studio lighting boom arm.  Not what it was intended for at all!! But it produced a dramatic angle.  The panning shot right before the action starts at 2min08sec was shot like this.  The camera fixed to the studio boom with a manfrotto magic arm and then panning on the mount on top of my regular Benro tripod.  Again, a nice video boom would have been great, but I wanted to make this with just the gear I had access to.  If you have read much about DSLR video before ,you will probably be aware of what “rolling shutter” is.  You really have to be careful with your panning to avoid this.  Slow and smooth is absolute necessity or you will get the jello effect.  I also found that the visibility of this effect was somewhat dependent on what shutter speed I was shooting at.  With a higher shutter speed it seemed to show up a lot easier.

Speaking of shutter speed, I experimented with that a bit too.  My preference was for the footage that was shot between 1/120 and 1/250 for the action stuff.  Anything faster than that and it gives it a sort of weird digital jerky effect.  For the lifestyle shots and interview shots I think I used it down at around 1/60 though.  I basically set the shutter speed I wanted, then used the filters to get to the aperture I wanted and then dialed in the ISO speed to get the correct exposure.  Incidentally, that is something that I found frustrating.  Its VERY easy to miss your exposure by a 1/3 of a stop because the “blinking highlights” feature is only available in playback.  Most times I would shoot a quick 2 second clip to check exposure before shooting the shot.  It would be great if there were some zebra lines to show overexposure.  They are available int he Magic Lantern firmware hack but I haven’t ventured that far yet….

One thing that I was pleasantly surprised about was how easily I managed to nail the focus in the shots even though it is fully manual.  The screen on the 5dMKII really is great and considering I wasn’t using any type of screen shade or eye-piece, I found it quite easy to get the focus right first time.  Pulling focus between 2 subjects takes a bit of practice to do smoothly, but its possible.

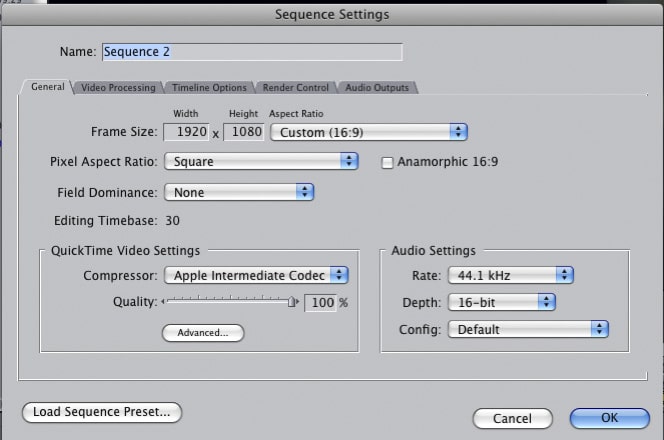
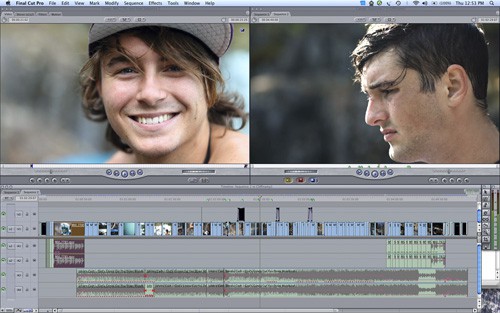
So once you have all of your video in a format that you can work with, import it all into Final Cut and set up a new project.  This is where you need to tread carefully, depending on which version of FCP you have.  I have Final Cut 5 and that caused some problems to begin with because I had no clue what I was doing.  In FCP 6 and later, when you drag a clip into the timeline, it automatically converts the timeline/sequence settings to conform to the setting of your clip.  In this case 1920×1080 , 30fps, AIC.  In FCP5 though, this does not happen and it caught me out for a while.  I had changed the Video&Audio settings under the file menu, but I was not aware that there is a settings panel for the sequence under the “sequence” menu, or ou can hit Command+zero.  In this menu, you also need to specify the video size (1920×1080), the codec used (in my case AIC), and also the frames per second (30fps NOT 29.97fps).  You will have to enter the “advanced” menu to find the drop down menu for frames per second and change it from the 29.97 default to 30fps.

If you forget to change these settings, when you export the finished product you will be left with video that has been stretched from the default 720p size up to 1080p and it will look terrible!  This took me a while to figure out….which some of you will no doubt find amusing.  But bear in mind I am speaking as a person who only just opened Final Cut Pro for the first time and there’s a lot to take in!

As you now have your timeline set up as an AIC timeline, all the transcoded clips you made will now play and edit in real time.  Once you have that setup its plane sailing.  With a reasonable amount of RAM in your computer (i’d recommend 4gb or more) you will be able to throw clips around and add transitions to them in no time at all.  For me, once I had those steps figure out, it all started to come together.  Video with a 5dMKII is not that daunting after all.

Tomorrow I will post the first video that I made and also some practical information about the physical shooting side of things.  Lens choice, shutter speeds and ND filters.


When I first got the 5dMKII last winter, the camera world was buzzing about the incredible HD video that it can shoot as well as the beautiful 21MP images.  This will be great I thought, I can shoot some videos in between shooting photos.  When it actually came down to it though, nice idea as it is, I didn’t have the time mid-winter to learn about shooting video and editing HD video or learn about all the weird idiosyncrasies that the 5d’s video has.  I made a couple of short videos that never turned out how I expected and then pretty much gave up on it until I had some time to sit down and figure it all out.

Every year in the Autumn downtime before winter I sit down and try and teach myself a new skill.  Up this year was naturally DSLR video shooting and editing with Final Cut Pro.  There’s a few things you need to be aware of, and a couple of problems to solve when shooting with the 5d so i’d better write it all down so you guys can give it s shot too.

The 5dMKII generates 1080p video files at 30fps in h.264 codec.  Only one out of these three things is actually a good thing.  Video people will look at 30fps and assume that I mean the NTSC standard of 29.97fps because it’s often shortened to 30fps when talked about. Wrong.  For some reason Canon decided to use an actual 30fps so that is something you need to bear in mind if you are shooting with any other cameras that shoot at 29.97 and intend to mix footage and audio together.  For me though, right now that wasn’t a huge problem and 30fps is just fine for web content which was my initial goal.

What was a problem though was the h.264 format of the files.  H.264 is typically used as a finishing format, it’s a codec used to compress movie files when you export them from an editing program like Final Cut or Avid (if you are on a PC).  The codec is NOT designed to be edited with and Final Cut will not handle it very well if you try.  Importing native h.264 files into FCP will have it breathing like its having a heart attack in no time.  Nothing renders in real time and a few seconds of footage requires a 5 minute render every time you make the smallest of changes.  This is what put me off the most when i first experimented with the video back in the winter.

First what you need to do is become familiar with some sort of transcoding program that will convert all of your h.264 video into a format that will Final Cut can handle at speed.  If you have Final Cut then you should also have Apple Compressor and this is certainly one program that can handle the task.  Another option though is a fantastic piece of freeware called MPEG Streamclip.  You can download it from their website HERE.

For batch processing a large number of files, I actually preferred using MPEG Streamclip for the job and it’s not at all as daunting as it may sound.  Which format you convert to will depend on your intended output for your project.  Are you aiming to make production quality TV shows, DVDs or just simply some web content at a scaled down size?  If you want to make the highest quality available to you, it is generally considered that converting to Apple ProRes 422 is the best option.  You will need Final Cut 6 or later though to have access to this codec.  Converting all the h.264 files is more or less a case of just dragging and dropping the files into Compressor or Streamclip and selecting the relevant setting from the menus.  I wont go into detail about that as its fairly self explanatory once you have the program in front of you.  Converting to ProRes format will roughly quadruple the size of your video files though, so if you go down that route, make sure you have some serious disc space available and a powerhouse of a computer to edit with…

If you are looking for a smaller file size then converting to AIC (Apple intermediate codec) is a great option.  File size is roughly half that of ProRes, it is very very hard to tell the difference between the two and AIC files are handled very quickly in Final Cut.  This is the option that I chose to work with for my project.

At this point i’m going to leave it here for now as this is getting quite long.  I have just finished editing a quick 5 minute short that I shot while I was going through this learning process and I will upload that to the web shortly, along with some more information on things I discovered whilst learning to shoot video with the 5d.

© 2010 Dan Carr Suffusion WordPress theme by Sayontan Sinha